A comment by
Ross Mac on
my last post got me itching to try some new ideas for my WWII grid rules experiment, while looking over the
Dutchy of Tragdardland's inter-war postings had me reconsidering basing/figure counts (again!) as well as vehicle scale (more on that in another post). Finally, I had done some very minimal research into effective ranges for various weapons. Thus, setting up a test game Friday night was inevitable and fueled by caffeine and watermelon, I gave in to the onrushing tide of fate.
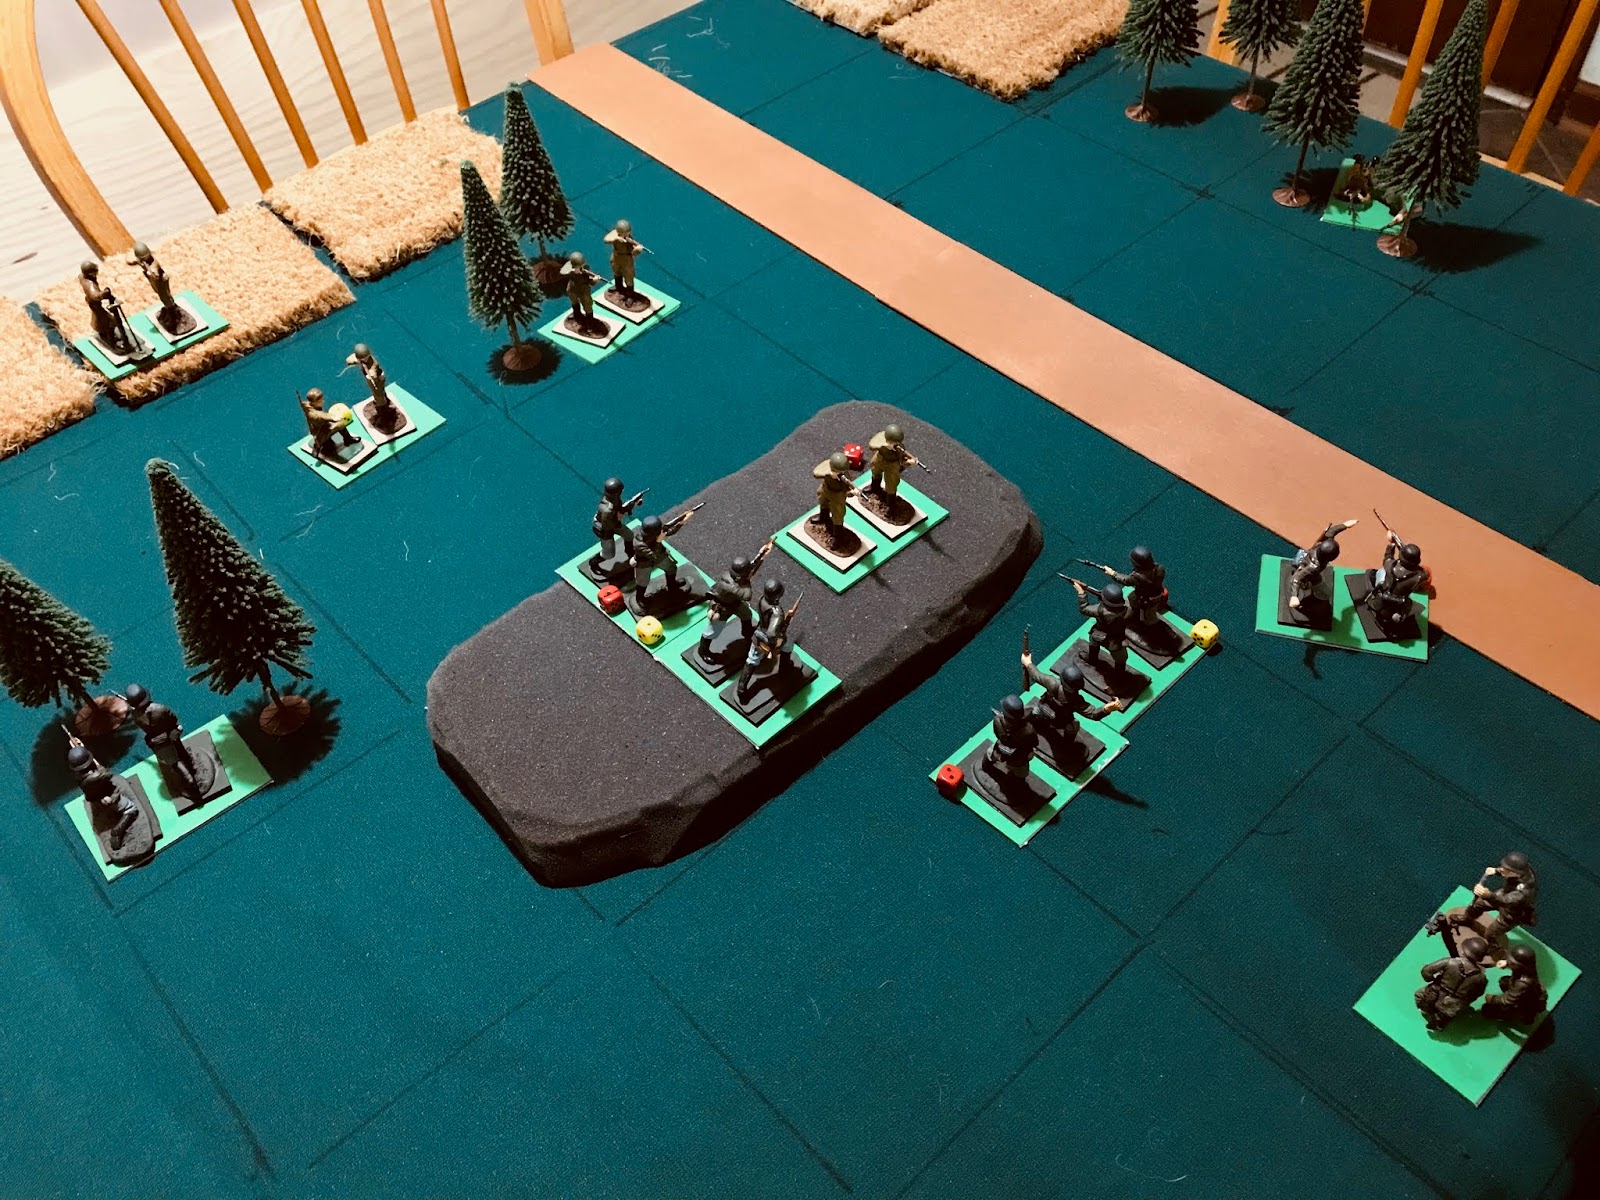
The new basing (3 inches x 2 inches, instead of 3 inches by 3 inches) is visible below. Two figures per squad stand looks good to me on a grid, but off-grid, three figures looks better (for say,
Company Command). An order of steel rectangles of this dimension is in my immediate future.
I opted to use a scenario #4, Take the High Ground, from
One Hour Wargames as the basis for the action. Two 3-squad German platoons, one with a 50mm mortar in support are attacking a single Soviet platoon, with MMG and light mortar in support.
 |
| Unlike the scenario setup in One Hour Wargames, I put a single squad on the hill, and the MG in the woods to the East as that made more sense to me. |
The suggestion Ross made pertained to multiple-stands in a grid-space and that it should have some sort of negative, in addition to the positive, to prevent horde tactics. I opted to try a few things. For MG fire, they could try for each stand (up until a maximum of two hits), and all units in the space not hit would test for suppression/disorder. Mortars would apply test suppression on all units in a grid-space.
 |
| This Soviet MG team would serve the Motherland well by hampering the German assault on the hill. |
This seemed to work well and made the MG a bit of a beast.
Another change was for close combat - I added an assault option which takes place as a move action, not a fire action. Each side rolls one d6. The attacker gets +1 for attacking, and +1 if there are 2 units attacking from the same space. MG teams cannot initiate close assault, but in defense gain +1. Cover applies a -1 to the roll. High score wins - loser takes a hit and is suppressed/disordered. If a defending unit is destroyed and the grid space is empty, the attacking units may move into the grid space.
 |
| The Soviets kept the Germans pinned and were able to hold out far longer than I expected on the hill with 4:1 odds. |
I think it needs to be deadlier than it was - but with a chance to regroup and attack/defend. Still, it worked for me for the most part.
 |
| But eventually the Germans captured the hill. The Soviets did not have support available to mount a suitable counter-attack, but Mother Russia's children do not retreat (they could try, but they'd be shot). |
One unintended side effect of the rules for attacking a square with more than one unit in it is that it changed my approach to taking out the MG. I kept the squads pretty far (each in its own grid-space) to lessen the effect of MG fire. This felt right even if it spread out the squads a bit further than doctrine might suggest (based on my six minutes of Internet research).
And with their bonus when close-assaulted - plus cover - it made it a risky affair to dislodge the MG - which again, felt right. Unfortunately for the Germans, while the mortar consistently managed to force the MG team to take a suppression result, they weren't able add a second or third, and so the weapon's team was able to clear it away the next turn without issue.
 |
| This MG team would prove very difficult to eliminate - indeed it never would be eliminated - and it repelled multiple attempts to dislodge it from the woods, until eventually it fell back and melted into the trees when ordered to do so. |
 |
| Although the Germans won by capturing and holding the hill, little remains of the platoon on the German right, thanks to the machine gun and some really poor dice rolling. |
I like how things are going with this experiment and may get around to writing up the in-progress rules at some point, but I will put away the WWII toys for a minute as I'm itching to get Army Green and Army Khaki back on the table.


Some excellent rules and reporting.
ReplyDeleteHave you seen Peter's grid based rules by the way:
https://gridbasedwargaming.blogspot.com/
Thanks Duc de Goblin. I had looked at his One Hour Wargame D3 rules but somehow missed his WW2 rules which seem like just the thing for the next scale up. Thanks again!
DeleteI enjoyed your post and set up. The rules seem fine to me. I really must get the interwar stuff out again. I was watching some Pathe news footage of manoeuvres in 1925 this week and it lead me to feel inspired again. For example Rolls Royce armoured cars with fabric fringe camouflage strips and sailors with hulking great radios .
ReplyDeleteThanks tradgardmastare. As my next post will show, I have been getting quite a bit of inspiration from your inter-war posts (you really need more of them!) I do love the look of Rolls Royce armoured cars. When I get around to starting my WWI project, I may need to find a way to sneak some in.
DeleteThanks Ross. Onward and upward as they say!
ReplyDeleteHey JOhn,
ReplyDeleteI think you could do a lot worse than use the general dice ratios of the One-Hour Wargames WWII rules. While the rules do lack a lot of useful things, that is one thing that has stood the test of time with me!
And of course you could add things in for skirmish-y infantry, e.g. making an HMG team fire at infantry at D6+2 but at armor D6-2 or something.
Inspiring in its stark simplicity as always!
I do like the OHW rules and despite my misgivings with the WWII rules, I keep coming back to give them more tries becaus of their simplicity. For this particular project, I *believe* I have finally found something that works for me, although if it turns out I'm wrong, I may consider borrowing from OHW!
Delete