Showing posts with label contemptible little armies. Show all posts

Wednesday, January 17, 2024

Country Road

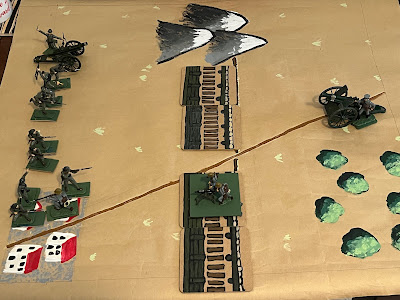
Inspired by a rewatch of Many Wars Ago combined with a couple of situations I came upon while scrolling through Infantry in Battle, I put together a little scenario for the Southern Front.

An Italian column is in retreat when a scout comes under fire and orders a halt. In Many Wars Ago (Based on  Emilio Lussu's A Soldier on the Southern Front), the commanding officer become incensed that the column has halted and orders the scout shot. Hilarity ensues.

In the movie and the book , an already dead soldier is used to convince the commander that the execution was carried out.

 In my scenario, the lead, well you can call it a platoon of four sections and a platoon leader, takes cover in the treeline and the platoon leader organizes an effort to eliminate the gun so the column can pass. The Austro-Hungarian force has improvised some defensive cover on a hilltop. It consists of a machine gun team and a security detail of 8 men (all of my "sections" are 8 figures), and low ranking leader type to oversee the whole thing.

The PL starts in the road. He is very brave or very stupid.

A group of soldiers on the Italian right draws a portion of the Austrian rifle fire.

A section is sent forward on the Italian left and struggles to reach the hill.

In the middle things are going terribly as MG and rifle fire take their toll.

The Italian assault reaches the objective. Bayonets clash!

Alas this did not go well for the Italians. As a result they failed two morale checks and can't advance towards the enemy - except for the one stuck in close combat. The PL takes off at a run to rally them but he is nowhere close.

The PL sends the adjacent section to storm the hill and to relieve the stalled effort.

They reach the top and finish the job. The MG team is struck down and the game is over. Italian victory!
 

Rules were Contemptible Little Armies(CLA), played at the author's stated scale of 1 figure = 1 man (although he's clear that it's whatever you want it to be). The pathetic rifle ranges were adjusted to cover the entire table (I may use Bolt Action's shorter, more cinematic ranges next time). 

Shooting in CLA is figure to figure - which allows the Austrians to split their rifle fire between Italian units. Most rules I have are unit to unit shooting, which would severely hamper the Austrians. That said, in CLA, in practice, I tend to do either figure to unit, or small subset of unit to unit. It works for me.

I think going forward I will implement GASLIGHT's method of distributing hits on a target unit - that way, your group of figures may score three hits on the target unit, but all three end up on the same individual.

The game went 10 turns overall, which surprised me, as I had thought 6 would be sufficient. However, the Italians, due to poor movement dice, took forever to get to the hill let alone engage in close combat. 

There needs to be a win condition for the Austrian force, too - perhaps casualties inflicted or "hold out for X and then retreat", otherwise there is no natural stopping point other than a fight to the last man for one or the other side. I'll be setting it up for another go soon.


Sunday, September 24, 2023

Same Stuff, Different Day

 I wanted to try using the off-table artillery rules in Contemptible Little Armies. So, Friday night, I set out one of my favorite scenarios on a 38" square table, treating each unit of 12 as a battalion. 

And it looked and felt all wrong to me.

The bigger table. The units representing battalions. All of it.

Saturday, I reset and set up a 24" square, and called each unit of eight figures a company. Immediately this looked better to my eyes and soothed my brain.

I gave both sides tactical ratings of 4 and morale ratings of 4.

The scenario, once again, is "Late Arrivals" from One Hour Wargames.

The Italian order of battle:

  • Commander
  • Defensive Barrage with Foward Observation Officer
  • Two infantry units
  • One machine gun unit
  • One field gun unit

They started with one infantry company and a machine gun unit holding the trench north of the village. Reinforcements are scheduled to arrive on turns 5 and 10 (two units each time). However, I am using the suggestion from CLA that they have to roll their morale or lower to arrive as scheduled - otherwise, check again the following turn.

All's quiet on the Southern front.

The Austrian order of battle:
  • Commander
  • Static Barrage of High Explosive Ammunition for turns 1 through 4
  • Four infantry units
  • One field gun unit
They arrive on the northern table edge via the road. Because movement in CLA is determined by rolling a die or two, the entry point is severely congested, and units arrive in a delayed manner. Unlike the Italians, they are not reinforcements and so no morale check required.

The lead Austrian company arrives.

CLA has complex turn sequence where each turn has 12 phases - although many require nothing other than noting that phase has come and gone. Off-board artillery arrives after all movement for the turn has completed, but before direct fire shooting starts. 

The static barrage is assumed to be sighted-in, so no roll to hit is required. For HE, a single die (representing one battery) is rolled for each figure within a 4" radius of the target point (which was the center of the trench with the Italian infantry company). On a 6 a figure is removed.

Success!

Two figures eliminated right away, and I began to think maybe having only two infantry units would not be enough to stop the Austrian tide. Spoiler alert: those were the only two figures removed by artillery.


Dramatic shot of Austrians in the crosshairs of the Italian MG unit.

In CLA, shooting is figure-to-figure not unit-to-unit. I realized during one of my many games that I wasn't quite handling MG fire correctly - I was rolling all six dice every time and then allocating to the target unit - essentially unit-to-unit shooting.

After reading again, and paying more attention, I noted that MGs can roll six dice, yes, but one die per target figure, and each figure targeted must be within 6" of the first. This can reduce the effect of the MG (not a terrible thing if you're the target).

This got me thinking about how much more I prefer the way GASLIGHT handles shooting. Each figure shoots but the target is a unit (so figure-to-unit) with casualties determined randomly (it's possible for a single figure to be hit more than once - frustrating for the shooting unit but more interesting for a narrative) and I may bolt that on to CLA.

Even so, the shooting by the MG, combined with the rifles in the trench, nearly wiped out the first Austrian company before they made contact. 

But contact was made! Just not much of it. And the first Italian reinforcements arrived.

Wider shot of the same. The third company had moved up in support. Second company had maneuvered through the woods, slowly, to take up a position opposite the Italian MG. 
 
I also discovered I had lazily returned to rules from some other system. In CLA, no regular infantry unit, mg, or gun, can move and fire in the same turn. However, I was allowing MGs to fire in the next turn. 

That is not the case in CLA. In CLA, MGs and guns cannot fire in the turn they move (or rotate) or in the next turn. 

I like this as it again provides a check on the power of the MG. Unfortunately, this time it didn't matter as the Austrian infantry took forever to get through the woods thanks to terrible die rolling.

The Austrian field gun arrives as does the Italian commander. The latter arrived on turn 6 after failing to arrive on turn 5 due to failed morale check. Typical.

Third company reaches the Italian held trench, supported by the fourth company. Shots from the second company in the woods were ineffective against the Italian MG unit.

Austrians penetrate into the trench line, but it is still heavily contested. The assault from the woods begins and the two lead platoons are nearly wiped out entirely.

The MG unit is destroyed in close combat, but the cost was high. The Austrian unit failed its second morale test and can no longer advance towards the enemy - they can't take the trench! The Austrian commander meanwhile is stumbling blindly through the woods (rolling 1s and 2s to advance).

The Italian counterattack on the Austrian right drives devastates fourth company. With nothing left to take either trench or the village, and with the Italian FOO and Field gun on the scene, the Austrians call off the attack.

An extremely satisfying game. 11 turns before I called it. 

It's not an easy scenario for the attacker using OHW rules, but I believe I still don't have the balance right for CLA - the issue being that in CLA the trench gives -2 to rolls to determine the result of a hit. with a 4+ total needed to remove a figure. That is, the attacker needs a 6 to remove a defender in a trench. 

Then again better artillery usage, and maybe throwing an MG against the defenders might help. As would treating the ground as open not difficult (2d6" vs 1d6" for infantry).

Using eight-figures as a company felt right and is the plan going forward (for CLA). I might expand to nine or ten eventually, but at eight figures, I still need to paint up two Italians and and an Austrian if I want to field four companies simultaneously. Once casualties start mounting though, I can just recycle them - which is how I handled it here.

Hopefully, I'll get to play again soon - perhaps maybe I'll play a different scenario even!

Wednesday, September 13, 2023

Contemptible Little Armies and the Late Arrivals

I don't usually post so closely to a previous post, but I  have been playing Contemptible Little Armies (CLA) a lot, in an effort to really dive into the nuances that might be there.

I decided to play a One Hour Wargame (OHW) scenario squished to a 24" square, rather than the 36" usually used.

The scenario is 'Late Arrivals' which is one of my favorites and one I played before on a painted 24" "board" using the OHW 'Machine Age' rules and 3"-4" wide companies. That was, in hindsight, quite a bit of space for what amounted to a single battalion with support. I opted to use the same painted board (it's quick to set up after all)  this time, but with CLA.

WWI is notorious for crowded battlefields, especially early-to-mid-war. While dependent on the situation/terrain, generally speaking, as a rule of thumb, a battalion in WWI had the same frontage as a company in WWII( I found this article extremely helpful in visualizing the differences). Thus, the 24" area should force the issue.

Rather than the intended 1:1 figure-to-man scale, which, as I've mentioned before, doesn't make sense to me with the rifle range, I opted to take up the author on their suggestion that figures and units are what you want them to be, and to use three figures per company. This is similar to the 'Machine Age' game I linked to above, but with individually-based figures and multiple battalions per side.

According to at least one source (H.M.G. by Agema) the Bersaglieri have three companies per battalion, so they field nine figures, while the Austrians have four companies, totaling 12 figures. 

Coincidentally, points-wise, which is something CLA has, it gives me 81 points for the Bersaglieri (9 points each) and 84 for the Austrians (7 points each). Really closely balanced by accident. 

And since the Bersaglieri have fewer men per company and a smaller number of companies per battalion, I feel like the equal-ish points reflects the "elite" nature of the Bersaglieri.

I'm using a 40 or so yards per inch based on some really iffy back-of-the-napkin math. Does it matter? No. Although the 12" range makes a whole lot more sense this way.

In any case, the scenario has three battalions of Austrians attacking with two battalions up and one following attacking on a 960 yard front, supported by a field gun unit and an MG unit. attacking a single Italian Bersaglieri battalion, with all three companies in the line (which was pretty typical of the Italians and a source of much dissatisfaction for the troops), with MG support holding a trench line some 640 yards long. The Italians have two battalions and a field gun unit in reserve. The commanders on both sides are starting off table.

In my head I was thinking the 1916 Strafexpedition  but it could just as easily be 1917 Caporetto or 1918 Asiago - admittedly the later dates would invite stormtroops and arditi.

I have played this *many* times now for testing the rules. Here is but one of those:

The lead Austrian battalion advances using the road. Unfortunately for the following units, it's moving kind of slow - road congestion is real!

Turn 5: A second battalion of Bersaglieri arrive to hold the village.

Turn 5 still, the first Austrian battalion has nearly disintegrated against the Italian defenses while whittling the defenders down. The 2nd battalion has finally moved into a position to engage the defenders on the left. The 3rd battalion arrives on the Austrian right to follow up the 1st battalion's efforts.

Turn 6, a jubilant Italian field gun arrives on the scene. For the Italian arrivals, used a CLA suggested rule for reserves to arrive and diced vs their morale. They failed the check on turn 5, but passed on turn 6.

The Austrians attack the trenches. Chaos ensues.

The trench is captured!

A third Bersaglieri battalion arrives in time to draw some of the attackers away from the village.

Side view of same - so you can see the Austrian field gun on the table shooting away, hitting nothing.

Both sides suffered tremendous losses but the Bersaglieri held off the attack. As the Austrians still hold the trench line (barely) a counter-attack (and Austrian reinforcements) would be a likely follow-up.

Interestingly enough - in every replay of this scenario, the game went to at least 13 turns and went to 15 on more than one occasion. It's rare that I go beyond 10-12 turns playing OHW rules. Play time was about an hour including picture taking. I know most of the basic rules by heart so I rarely need to look at the QRS even, and that helps keep the time spent playing.

It's also a scenario where rarely does the attacker win (when I play).

The playing area looked pretty congested which is what I expected and it felt accurate that way. Road congestion was a pretty common occurrence. The variable movement rate in CLA really added some pressure to the Austrian cause - and I found myself focused on getting units to where they needed to be and out of the way of the units following so that I could bring the full force to bear. 

The ticking time clock of the turn counter though forced some decisions, like attacking on the right before the unit on the left was even in position. The benefit there would have been the Italian unit would be losing figures from a single unit, thus forcing morale checks potentially earlier and more often. Although it would have brought the Italian MG into play sooner.

The MG unit in CLA is much more effective than the Heavy Infantry of OHW, and silencing it as soon as possible is a pressing issue once it starts shooting. It rolls 6 dice, and the Austrians are hit on a 3 or higher. The woods only provide a -1 benefit when checking for figure removal (4+ is required normally, so 5 or 6 with the bonus), so MGs cut down the Austrians pretty fast. You can't spend all day plinking away at the MG unit from the woods, hoping to score a removal.

On the plus side of that equation (the one where Austrians are easy to hit), 12-figure units stretched my force capacity and were it not for recycling losses into later arriving units, I could not have fielded three Austrian units. It looks like getting another bag of figures from Armies in Plastic will top my 2024 shopping list.

The next step for CLA for me is to incorporate off-table artillery fire for both sides.