Thursday, June 27, 2019

Dunkirk (1958): Movie

I've watched quite a few shows and movies of late that I have failed to document - TCM had a handful of movies on June 6 that I recorded with more every Thursday since (and I'm slowly working my way through them). On top of that, I watched a few movies and Russian TV shows on Amazon Prime.

So far, of the movies I hadn't seen before, the stand out has been Dunkirk - the MGM 1958 version, not the more recent one. I would rank this among my favorite war movies even after just one viewing.

It's a wonderful film that I'm sure almost everyone but me has seen. The changes in perspective between home front and war front, until they merge together works very well. And of course, it needn't be said, but I found some inspiration for gaming while watching, thanks in large part to the zoomed in focus on a depleted section of British infantry.


If you haven't seen the movie, stop reading, and go watch it.

From a gaming perspective, I think there were 3-4 good candidates scenarios of the kind that would work with One Hour Skirmish Wargames or a similar 1:1 individual soldier type game, like 5 Men in Normandy, or Nuts! (the "Chocolate and Cigarette" rules). I'm in the process of working out the details, but won't have time to try anything until next week at the earliest.

In any case, I have maybe ten Tommies in 1/72, along with one Churchill tank, and ten Germans, with no vehicles; all are left-overs from my initial foray into war games some 15 years ago. I have but three British infantry in 54mm - Britains (not Deetail though) that I acquired for a song. So, I do not have sufficient forces to field my ideas in any case - and barring an ebay score (not without question) I'll probably proceed with proxies in 54mm.

Wednesday, June 26, 2019

A New Arrival

My copy of Advanced Squad Leader: Starter Kit #1 arrived a little earlier today- the cat hair in the picture was not included (it's just part of my daily existence, like water, food, and air).


While researching and working on my own rules, I often found myself looking into how ASL and similar games would handle this or that, and I figured, why not just go in all the way and really find out?

The Starter Kit has good reviews and support, so hopefully it's not too much of a hill to climb.

I am excited about this to the point that I am looking at cancelling plans in order to spend some time with the rule book!


Tuesday, June 25, 2019

Card-based Initiative and Long Runs for One Side

I have been contemplating how to deal with the possibility of a long run of cards for one side in my Company Fire rules (available in the side bar).

For those who are just joining us, my rules use a single deck of cards for initiative. One side is assigned red, the other black. A card is drawn from the deck and the side with that color can act. However, it doesn't mean they can necessarily do what they want without restriction: an odd card means the side can move (or fire with a penalty), an even  card means they can fire (or move if they pass a test), and a face card means they can move/fire as desired.

The enemy can opportunity fire during the other side's movement and they roll when being close assaulted but otherwise they aren't doing much.

German ATG Draws a Bead on the Approaching US Jeep.
 As a solo player, it's not really a problem - I'm doing something on every card after all - and in any case, you can just explain it away as momentum/luck was on their side. I think that's the way it's treated in Piquet and I don't think it's unrealistic in that respect. Realism doesn't always make for a fun game, however.

I can imagine if someone were to try this mechanism with two players one side would either be bored or frustrated by their inability to do much of anything except opportunity fire. Even as a solo player, it can be frustrating, as I tend to side with whichever side is doing poorly in the moment.
 
Here are two ways I have settled upon as candidates, although I have not decided between them.

Idea 1: Steal from Crossfire.

Crossfire is a big inspiration behind these rules - not that I've ever played it, I just like the idea of the rules, and the AARs are always fun to read. They *sound* like a game I want to play. Except they don't use a grid and I am grid-happy right now and want to play the 2x2 Crossfire Scenarios on a grid.

Anyway, one of the key things about Crossfire is that you have initiative until your opponent takes it from you or you give it up. You can have initiative for a long time but your opponent still gets to take actions and so isn't super bored waiting for you to finish rolling over them.

So for my rules:
If any attempted action fails - meaning a failed rally, no suppress/kill on shooting, a moving unit is suppressed or killed by opportunity fire, the attacker loses a close assault, failing a movement test - no further action may be taken on card by any remaining unit and a new card is drawn.
Long card runs are still possible, but any given card has a chance to end before all units have taken their actions. It doesn't necessarily take away the initiative from the phasing player the way Crossfire does - since the next card could still belong to the same side - but it may help make those long runs less boring for the other player. At the very least, it makes failure for actions have some severe consequences and adds makes the decision making process a weightier matter.

Idea 2: Steal from Advanced Squad Leader

I mentioned in my last post that I ordered ASL Starter Kit #1. I did some reading about it online and found a nice explanation of the turn sequence. One thing I liked was that the non-phasing side gets to take more than just reactive fire. So, why not do the same?

So:
Once all actions by the phasing player are complete, any of the non-phasing side's units that didn't opportunity fire or can't (in the case of light mortars), can fire, using the rules for individual units.

This is not a moment for coordinated group firing, but individual squads, teams, and vehicles can fire. Again, it doesn't prevent a long run of cards, but it does mean that the non-phasing player isn't just twiddling their thumbs, firing with one unit here or there in opportunity fire. Both sides will have a chance to act on every card in some way.

Idea 2b: Same as above with one other option.

I also contemplated allowing non-phasing units a choice of either moving (limited  to 1 space, and perhaps only away from the other side) or firing. I think that might be too much but I'll have to give it a try to really know.

Regardless, of where I land, I definitely need to play some more games to sort this out (not that I needed an excuse, but it's always good to have one!).

Monday, June 24, 2019

Bits and Bobs

This is sort of a random collection of updates - some recent acquisitions arrived and I've done a little more painting the last two nights.

First the acquisitions:

The Expanded edition of Charles Grant's "Battle" and Lionel Tarr's "Modern Wargaming Rules" edited by John Curry.
I received the Battle book today and I have only read the introduction - although I have read bits of the book as it appeared in Mecanno magazine thanks to the wonders of the Internet - and I am quite happy with my purchase - used copies of the original book go for more and since I'm not looking to collect first editions, the expanded edition  was the way to go for me.

The Tarr book (more of a collected works really) arrived Saturday and I have nearly read all of it. I'd have finished already but I keep going back and poring over what I've already read - so much inspiration to be found here. The price for this volume was on the opposite end of the scale of Battle, but the book is no less valuable. John Curry has done the world a favor with these low cost paperback editions of classic wargaming writing.

On a side note, today I purchased a copy of the reprint of Advanced Squad Leader Starter Kit #1. I fear for my sanity, but I have been very curious about this game since I started wargaming (which was just 15-ish years ago, although I can't believe it's been that long)  and the price was right.

Last night, I got more time with my French - the first coat for the backpacks and rifle stocks, and a billionth coat for the helmets:
They almost look like soldiers.
Tonight, I worked on some Chinese Airfix knock-offs (well, 3, one of them is an actual Airfix):
For use with my rules, Morschauser, or the Portable Wargame.
There is touch up and some details, like rifle barrels and gas mask canisters, to finish, not to mention clean up of some sloppy painting. Also of note is the terrible job I did removing flash and mold lines from the knock-offs.

The base color, which has been roughly applied as a proof of concept, is Delta CeramCoat Green Tea. It was an experiment to impart a more toy look to the figures and I'm rather happy with the result. I'll be gloss coating them as well - along with the rest of the Germans and Soviets - which will undoubtedly raise some gasps from parts of the gallery.

My goal is to finish these up and start working on filling out my Soviet force with rifles (I have lots of SMGs). After breaking out the US for the Bloody Omaha campaign I realized my interest with my plastic 54mm collection is far more with playing games set on the Eastern Front of late - in no doubt due to all of the Russian WWII movies and TV shows I've been watching. The Tarr book was a good kick in that direction too.

Saturday, June 22, 2019

Skirmish Campaigns: Grandcamp (Bloody Omaha Campaign, Game 3)

Friday night I fought the third and final battle of the Bloody Omaha campaign from Skirmish Campaigns:Heroes of Omaha and Panzer Lehr. The scenario is called "Grandcamp."

The scenario is set on June 8, as the 3rd Battalion of the 116th Regiment, 29th Infantry Division, made its way west of Point-du-Hoc and encountered elements of German 1st Battalion, 914th Infantry Regiment, 352nd Infantry Division.

The battle field. US enters from the right.
The US objective is to move from east to west (right to left in the picture) and either capture the farm or exit a portion of the troops off the west edge. If they can do both, they earn a decisive victory. The Germans win by denying the US their victory conditions, and earn a decisive victory if a certain percentage of their troops survive the encounter.

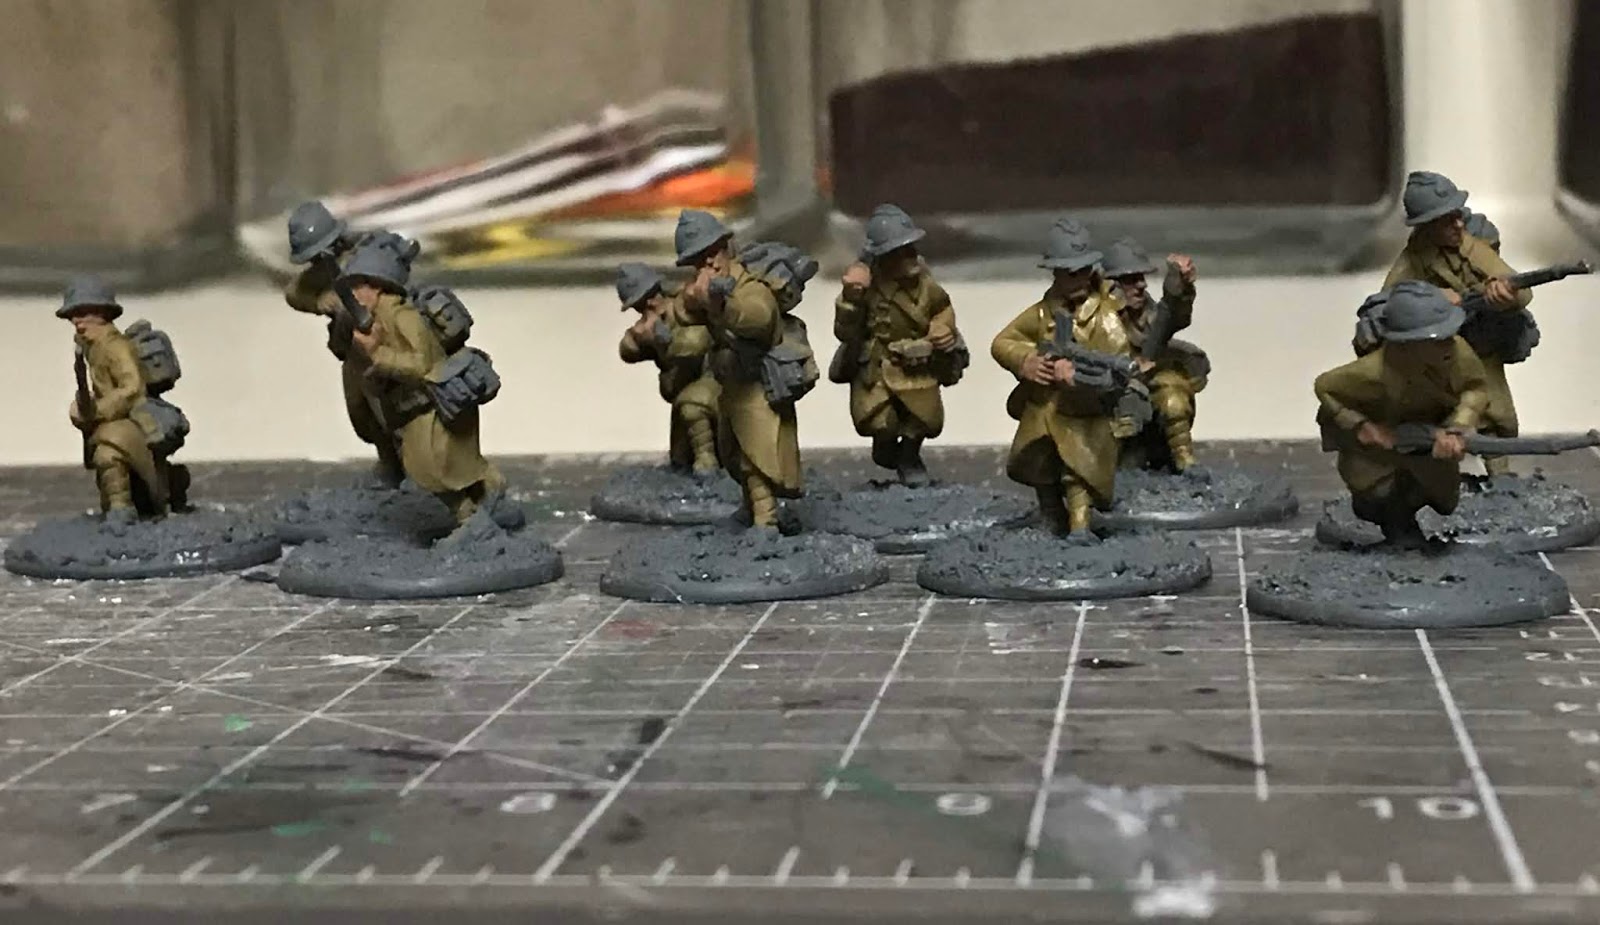
The Germans, off map, awaiting their deployment. 
The PL and the rifle squad held the farm (I played the scenario twice - this report is the second. In the first game my blinds were too random and the Germans were scattered in ways not logical for winning the scenario. I also forgot a few scenario rules, and that the MGs were light and medium, not heavy).

Converting the order of battle, the Germans have a Platoon Leader, a rifle squad (each man armed with a panzerfaust -8 in total), an MMG team, an independent LMG team, and a PAK38 and crew. Lacking a PAK38 model, I used one of my Britains guns for a "close enough" match.

US advance is underway and cautious.
The Americans had a PL in jeep, one Sherman, an MMG team, a forward observer for an 81mm mortar battery (10 fire missions), and a full platoon of three rifle squads - one with a bazooka.

The US got off to a slow start,with troops taking positions in the bocage trying to see any enemies using the next hedgerow for cover.

German LMG team fires on the American MMG.
On their left, some suspicious greenery turned out to be occupied by the German independent LMG team, who opened fire and pinned the US MMG.

Having revealed themselves, they became a target for the tank, who advanced with the PL in the jeep. A few rounds of HMG fire and the German LMG was suppressed - and then inexplicably I sent the jeep and tank to flank the farm, and moved the MMG up to support the infantry advance on the right (also heading for the farm), leaving the LMG team to try to rally (it took them quite awhile but I would pay for it when they finally did).

PAK crew opens fire on the Americans.
The Germans had a nasty surprise waiting for the American riflemen when they stepped out of the bocage into open ground - the PAK38 crew was pointed straight at them. One of the squads was suppressed (I kind of screwed up my own rules - ATGs can only damage a single unit, they don't damage all units in the space. It wasn't an issue here).

Firing from the safety of the bocage, the US rifles shot up the PAK crew with ease and then moved quickly, and recklessly towards the farm.

Tank assault on farm as infantry move up under fire.
The infantry advanced straight into the line of fire of the German HMG, located in the fields north of the farm. Simultaneously, the American Forward Observer called down fire on the farm - and would do so repeatedly for 8 fire missions.

The Sherman and jeep, far more cautious than the infantry, moved slowly down the road revealing some blank blinds and then set sights on the farm.

A shoot out between the Sherman and the Germans inside the farm began - and while the Germans did manage to score a suppression eventually with their Panzerfaust, it was too little, too late and once rallied, the tank's main gun suppressed them in time for a heavy mortar barrage to rain down and take them out.

Sherman destroys German barbed wire.
 The US infantry got hung up a bit German MMG and the rallied LMG that eventually made it to the fight. Amazingly, the LMG team ended up suppressed and then close assaulted, still won its close assault and destroyed their attacker.

It took some doing, and the US lost two squads and their MMG as casualties, but  once both German MG teams were suppressed, the remaining US squad occupied the farm, while the Sherman cleared the way for the US to advance to the west. The German position became untenable.

The US force continues their advance.

The US made it off the table and I called the game a US victory after 8 turns of the allowed 12.

Since they could not both hold the farm and exit enough troops to satisfy both victory conditions, it wasn't a decisive victory, but it was enough to win the campaign.

****
While playing I found a few problems in my QRS, so I took the link down while I fix those. Also, for the first time I had runs of cards for one side or the other near double digits. This is fine for me,as I play solo, but clearly it's not something that would fly for two player games.I need to think on that a bit.

Overall, the campaign was a lot of fun, my rules gave enjoyable games even though they still need tweaking. The vehicle rules worked well - although I feel like tanks should be more devastating, so there may be more changes there. That said, I'm looking forward to playing the Crossfire 2x2 scenarios some more, and vehicles don't make an appearance there, so it may be awhile.

Friday, June 21, 2019

The French Have Hats!

To my own surprise, I was inspired to paint again this week, and so here they are now, with helmets base-coated.

They are starting to look like soldiers.

I also did yet another coat on the uniforms - and still I see a spot I missed -  and the flesh.

Next, yet another coat (the 4th really) on the helmets plus rifle stocks and boots.

I'm taking this very slowly - it's a sideshow really, and I don't want to burn out before I finish the entire force I acquired.

Thursday, June 20, 2019

QRS for Company Fire Available

EDIT: I found a few errors and missing things during my Friday night game, so I have temporarily broken the QRS link. Sorry!

Like it says on the tin, I wrote up a QRS for my grid-based WWII (arguably) rules - these include my vehicle rules, such as they are. They are linked over on the side-bar.

"Quick reference sheet" is a bit generous - they are two columns by 4 pages (2 sheets of paper front and back), and contain quite a bit more text than I originally imagined. They could probably stand some trimming but using them in my next campaign game will show me where the unnecessary fluff is (hopefully). So, to cover my bases, I'm calling it a draft document!

It was a challenging exercise and gave me some appreciation for the difficulty rules authors of far more complex systems must face when trying to distill the game down to a few sheets of paper.

If you decide to download/view them/or heaven forbid, play them, where the QRS differs from the current rules link, the QRS takes precedence, as it is based on the most current version of the rules, which still need tidying up before I share them, including adding some visually stunning graphics:


Illustration of which attacks qualify as being against front armor.

Tuesday, June 18, 2019

Tanks a bunch!

Tanks are full of problems when all you originally had in mind was a relatively simple infantry game to play engagements between companies or so per side, where tanks generally would be pretty scarce (think Crossfire scenarios).

Why are they so troublesome you ask?

Because it turns out once you start thinking about tanks, you have to start considering other vehicles that might come into the game and how the rules will work for them. After all, it does no good to have a completely different mechanism for different vehicle types. And, to no ones surprise, there are lots of kinds of vehicles: motorcycles, wheeled, tracked, half-tracked, armored, with and without mounted weapons of their own, those with rotating turrets, those with fixed-turrets, etc.

It's enough to really clog up the brain with options and we still haven't mentioned gun size, armor thickness, penetration depth of anti-tank charges, sloped vs flat armor, etc. And, oh wait, how fast do they go?


This Solido Panzer IV and Deetail paratrooper on this way too small grid have helped me figure quite a bit of this all out.

It should be no surprise that I've gotten lost in the weeds a few times. The weeds being the Internet, where experts and non-experts alike offer opinions, facts, and complete hearsay about vehicles in WWII.

That said,I *think* I am getting there, and with only minimal additions to the existing rules for infantry - well at least in terms of the mechanics involved.

EDIT: Almost forgot, came across this interesting resource German Tank Maintenance in WWII.

Saturday, June 15, 2019

Warlord French Progress

It's hardly much progress, but in order to keep myself motivated I'm going to post where I'm at:


As you can see I've base coated the flesh and put a coat on the, er, coat, puttees, and pants.

I'll apply a second coat and then move on to the rifle stocks and helmets.

And shhhh, don't tell anyone, but I'm kind of enjoying the change of pace painting smaller figures.

Skirmish Campaigns: Ranger Relief (Bloody Omaha Campaign, Game 2)

Friday night I had my second go at the Ranger Relief scenario, this time with the correct table layout. Unfortunately, pictures are a bit scarce due the concentration on the game itself.

D-day +1, elements of 116th infantry regiment, 29th infantry division moved towards Point-du-Hoc to relieve the rangers there. A German force from the German 726th infantry regiment, 352nd infantry division did it's best to prevent that. Meanwhile German recon patrols pushed behind US lines. (Skirmish Campaigns, Heroes of Omaha and Panzer Lehr, p.16)


German OOBUS OOB
2 infantry squads2 PLs
2 recon patrols6 infantry squads
2 MMG teams2 scout teams
2 6" barbed wire sections1 60mm mortar team
1 mine field

Edit: Due to the specific victory conditions as written in the scenario, I doubled the size of the base forces (with the exception of the mine field). From what I have read online, Skirmish Campaign scenarios are just scaled down forces,and can be scaled up without issue. Seems true enough.

The US objective is to move two squads off of the West edge of the map while the Germans need to to get one of their recon patrols off the East edge.

The map. 

The Germans were represented at the start by blinds with a portion of dummies, the recon patrol blinds would arrive on the West edge on the first German move card, and would be placed by die roll. The US was under my control, which was enough of a handicap for them.

I opted to attack in force on a 200 meter front with my two platoons, figuring we could deal a blow to whatever waited in the fields to our front and then push past them and off to the west.


The scouts proved their worth almost immediately and revealed an HMG and German squad operating within the bocage in the fields opposite the US positions.

Scout team spots German MG crew.
Unfortunately, for the US, the Germans would prove intractable, and they had the area well covered with intersecting fields of fire. Crossing the road to close assault the German position proved disastrous.

Shortly before crossfire from the US left - blinds revealed an MG and rifle squad - cut down a PL and squad caught in the open.
Meanwhile, the German recon patrols wound their way through the bocage and fields on the Southern portion of the map, and met their objective.

The US assault never gained any real traction before the game ended (presumably left to find another way around).

The game lasted 7 turns (per the scenario design, I rolled 1d4. The result of 4 meant the game ended immediately).  Had the game gone 1 more turn, it would have been a draw in terms of objectives (more smoke, some shooting that scored suppression and pins, and a good run of cards helped), but the US would have scored more victory points for kills. I know this because I kept playing just for giggles (the official result would be the end of turn 7).

The US still has two attachment credits left over from their victory in the last game,while the Germans go into the final scenario with 6 credits. The US still holds the lead 9-7 in victory points, so it's a nail biter. Tanks make an appearance in the next one, so my next step is to decide on some basic armor rules.

Thursday, June 13, 2019

New Grid Cloth Project

Never in a million years would I think this kind of thing would be exciting, but here I am; today's mail contained a package with my new fabric:

No matter the lighting, it is a rare occasion I can accurately capture the color of my ground cloths. This was not one of them, but it's close.

This is the same style of fabric purchased previously to revamp my gaming table appearance - a celery green microsuade - but this smaller cut is earmarked for grid use (it's roughly 72" x 58"  instead of 108" x 58") . I have lamented my existing grid cloth on more than one occasion and figured it was high time to replace it.

Of course, as I have proven by using metal movement stands and magnetic sheet, I can't commit to anything, and in this case, I am referring to grid space size. I want both 6" and 4" squares, but the fabric is not the same on both sides (there's no reason I can't use both sides, but I like the microsuade side better). So, I came up with this grid pattern:

I am old enough that I find doing this sort of thing with pencil and grid paper easier than on a computer.

I mean I didn't invent it or anything, but I think a series of plus signs for the 6" corners, and dots for the four inch corners, in a similar shade of celery, will make for a functional dual-grid cloth.

Tuesday, June 11, 2019

Ranger Relief Fail

Last night I set up the table for the "Ranger Relief" scenario, the second in the "Bloody Omaha" campaign" in Heroes of Omaha and Panzer Lehr.

Unfortunately, I missed an entire section of bocage - about 12" worth - which I feel changed the outcome from a possible German victory to a draw (it would have blocked the shots which took out the German recon squad before it exited the table).

US platoon with mortar support moves up through a field. The squad at the top engages the German HMG and rifle squad diagonally opposite - all are occupying bocage and thus have LOS to each other.

 So I'll give it a go again the next time I can play - but I'll double check my setup first!

The German HMG and rifle squad take positions in the bocage, giving them protected positions from which to fire.

On the plus side, I tried some rules for scouts - since this was the first time I've had them come up - and a new rule for HMGs (it seems to me like facing should matter for HMGs and ATGs,  which  make an appearance in the next scenario).  And I found a confusing lack of explanation in my rules about whether occupying bocage uses up a movement action or not or whether it triggers opportunity fire.

Once all of that is addressed, I'll upload a new copy of the rules and update the link in the sidebar.

Monday, June 10, 2019

WWI Italian Front Miniatures Options

With Father's Day approaching here in the US, I have been tasked with picking out just what it is I want as a gift. Italian WWII troops to oppose my early war French are one option, but another option is to make some gains for my Italian Front WWI armies. While I have a number of figures in 1/72 plastic in the unpainted pile, I'm not sure if I'll end up using them or not.

As I noted in a post some months back, I haven't made any final decisions about this project, but I am leaning heavily towards squad or platoon type games for playing out patrols, raids, trench assaults, and recon missions due to the domination of insane frontal assaults with poor artillery/infantry coordination by Italians against well protected fortified Austrian positions. It doesn't exactly scream thrilling war game.
https://en.wikipedia.org/wiki/Italian_Front_(World_War_I)#/media/File:Italian_Front_1915-1917.jpg
I could either do these kinds of scenarios earlier in the war, 1915/1916, where standard infantry handled these kinds of things, albeit without the freedom of individual initiative, or later with assault infantry (sturmtruppen and arditi) with the other side being standard infantry,

The former option is obviously less expensive as I would only need two collections to function in both the role of the attacker and the defender, whereas the latter option requires standard infantry and assault infantry for both, if I want to play scenarios featuring either side as the attacker.

http://www.metropostcard.com/war7a-j.html

At least, that's how I am thinking of it now. There is still a small temptation to field large numbers of figures- perhaps even later war, when England and Germany were present as well

In any case, I thought for the benefit of others who might wish to game this era and theater, I would share links to what I know exists and is currently readily available at the time of this writing for the Italians and the Austrians.

Plastic

1/72
There are couple of offerings in this scale, including support weapons and artillery - you can find them on PlasticSoldierReview.com which I've linked below.

  • Italian  - Sadly, there are no arditi yet available, but there are some nice alpini.
  • Austrian - the link is to the Austrian section, but most of them are caps, not helmets, so primarily early war. Germans might make good substitutes or at least head swaps. No specific Austrian sturmtruppen sets. German sturmtruppen would work well enough for these.
1/35
Italeri and ICM both offer multi-figure kits in 1/35, but options are pretty limited, and pricey.

1/32
The options in this nearly perfect scale are very limited as well.

You might be able to use some of the WW1 French AiP as the basis for helmeted Italian conversions. With the exception of those in great coats (the only pictures I can find of Italian troops in coats are officers and they look nothing like the French coat), I think a few of them would be passable with just a paint conversion, but I'm pretty lose with my historical requirements.

EDIT: It looks like someone at AiP agrees with me: World War 1 - 1915-1918 - Italian Army - Balkin Front


For Austrians in caps, I have often thought Airfix or Deetail Afrika Corps figures could be pressed into service with some conversion work. For helmets, AiP figures again, this time Germans in stahlhelms, EDIT: and again:(World War I - Austrian Sturbattalion Assault Troops 1916-1918) could be converted into later war Austrians.

  • Waterloo 1815 Italian infantry  - the only offering I could in this scale. These figures are identical to some of their 1/72 figures, but larger, obviously.

Metal

Even in metal, no one covers every contingency. However there are a lot more scale options.

ScaleManufacturerNationalityNotes
6mmBaccusItalian Line infantry, bersaglieri, pioneers, cavalry, MG (line and bersaglieri), and artillery pieces
6mmBaccusAustrian Line infantry with caps, MG, artillery, cavalry
6mmIrregular MiniaturesItalian Arditi, alpini, and  bersaglieri, the latter having an mg option as well, and an artillery piece
6mmIrregular MiniaturesAustrianQuite a bit more variety, including caps and helmeted infantry, cavalry, artillery, mg, and command
10mmPendrakenAustrianSeveral sets, including vehicles and support weapons
10mmPendrakenItalianSeveral sets including support weapons
15mmEurekaAustrianCaps, mg.
15mmEurekaItalianCaps, alpini, mg, artillery crew
15mmIrregular MiniaturesAustrian Nice variety although no stormtroopers.
15mmIrregular MiniaturesItalianUse the same link as Austrian. There's no direct link. Some variety including arditi.
20mmIrregular MiniaturesAustrian Early war.
25mmOld Glory 25sItalian Infantry in both caps and helmets, alpini, bersaglieri and mgs
25mmOld Glory 25sAustrianOne infantry and one mg set.
25mmBattle Honor 25sAustrian Al in caps, infantry and cavalry, as well as mg and field gun
28mmBrigade GamesAustrianAll in caps, mg, trench mortar, mountain gun
28mmBrigade GamesItalianInfantry in caps, alpini, pioneers, arditi, trench mortar, mountain gun
28mmScarab MiniaturesAustrianMixed caps and helmets in same set, sturmtruppen, support weapons
28mmScarab MiniaturesItalianInfantry in helmets, arditi, support weapons, trucks
54mmIrregular MiniaturesAustrianEarly war Austrian officer and infantry in caps and a useful gun model
54mmIrregular MiniaturesItalianFrench infantry - provided not in great coat - could work and a useful gun model
54mmIrregular MiniaturesAustrian/ItalianThis is a link to the Irregular Empire-multi part figures which you can piece together to form either Italian or Austrian, early or late war, as desired.


Friday, June 7, 2019

Company Fire: WWII Grid-Based War Games Rules for a Company per Side

The name isn't the most original, but then neither are the rules themselves - a Frankenstein's monster of mechanisms borrowed from other games and sewn together into a way that works for me.

I have gone ahead and shared a link over on the sidebar to the current copy of the rules. I'd link them here but then someone will find this post a year from now and it will no longer be valid - so the sidebar it is where it's easy to maintain.

The name is a handful now that I look at it and that they are a company-per-side may seem arbitrary, which, while it is, it also isn't.

Ambush!
And my that's a nasty mold line when viewed in close-up!
The rules will be updated as long as I continue to play them because inevitably, I will find things wrong with them, even after I think "Ah! Done!" Because as a war gamer, and a solo one at that, tweaking rules or even trashing them wholesale and starting again, is my birthright. There's also quite a lot missing - things that would normally be in a proper set of rules, like explanations of cover and line of sight. You're on your own there but I am aware that I have left them out at this time.

Before someone is disappointed by their absence, armor is not yet accounted for either. I am adding things as I run into them in my own games. In the near future, I'm likely to improvise armor when it makes an appearance due to a particular scenario's design and from there I may settle on something.

Or not.

For those who want to check these rules out please do. If you play them and have questions, I'll try to answer them based on what I was thinking when I wrote the particular rule at play. If play them and you think I've gotten something completely wrong, you are probably right and I'd love to hear your suggestion for fixing it.

Oh and one last thing, I didn't explicitly state it, but will in the next update, but you don't need any minis or terrain to play this; counters and a grid of some kind will suffice. Indeed, I played more than a few games just that way to try out various mechanisms when taking over the kitchen table wasn't an option.

D-Day Commemorative Game: Skirmish Campaigns: Bluff at Easy Green

To commemorate the 75th anniversary of D-Day, I wanted to play a war game set on that Day of Days  - which I guess is odd to some (probably not anyone reading this) but to each their own.

I chose to play "Bluff at Easy Green" from Skirmish Campaigns : Heroes of Omaha and Panzer Lehr. It's a small scenario, even with the adjustments I made to it (which I'll save for another post).

Here is the background:

On June 6, 1944, in the chaos of the landings, entire companies ended up far from their planned landing points. Major Sidney Bingham, Jr., 2nd Battalion Commanding Officer of the 116th Infantry Regiment came in on Dog Beach and was among the first to reach the shingle. He gathered up remnants of Company F, approximately 50 men, and led them "across the shingle near the prominent three-story house at the mouth of the draw" advancing towards Ste. Laurent.

[the above comes from a combination of Heroes of Omaha and Panzer Leher and Omaha Beachhead from the US Government Printing Office (it's free!). ]

My modified OOBs:
Germans (on table):
2 LMG teams (1 of which has a dug-out through bocage)
1 Rifle Squad
1 mine field

Germans (arriving on turn 1-4 determined by 1d4):
Platoon leader
1 Rifle squad

The US has 5 squads, 1 infantry battalion leader, 1 MMG team and a sniper.

Turns: 7-9 turns.

Victory Conditions: US has to get two squads off the map from any two roads. Bonus if they can take the farm house. The Germans have to do their best to prevent this, but this is the first game in a three game campaign so it's better to get out without losing too much.

One of the German MGs started in the farm house in the South East of the map. The other MG with the dug-out would be determined by die roll and the rifle squad position by blinds. 

Map (should have rotated it around given the angle I took the pictures at)
Major Bingham ordered a three squads and the sniper to move around to the North and West of the fields, to work their way back to the farm house from the rear, while he lead the MG and two squads from the East. Immediately the US left (as pictured below) encountered fire from the German MG with the dug-out.
I decided things looked too crowded so I went to two figures per squad after this was taken.
This was followed by fire from the stone walls East of the farm house. They were pinned down while they exchanged fire with the German MG until finally destroying it and then made fast work of the rifle squad.

One of the US squads took suppression and needed some extra effort from the Major to get them moving after being caught in the open so long. Meanwhile, the MG team moved to the North end of the field (South of the farm house), while a squad moved up, hugging the bocage and staying out of the LOS of the farm house.

On their right, the German reinforcement arrived at the road in the center and made its way into the fields, taking cover in the bocage and firing on the US squads advancing from West.


The sniper, combined with the two squads took out the newly arrived Germans before their platoon leader could reach them. Moments later, the PL was overrun by the advancing Joes.

Meanwhile, Major Bingham brought the MG team up through the bocage into the field to exchange fire with the MG in the house, while the two squads moved up intending to close assault.


Unfortunately, this was a terrible plan and the squads failed to dislodge the MG despite the fact that it was pinned and they were destroyed in the process.

However, seeing no chance given the approaching US forces and the ongoing firefight with the .30 caliber in the field, the MG team hightailed it South up the road.


The US won a decisive victory in 6 turns - moving units of of the road and taking the house and so will get 4 points with which to modify their attachments roll (the additional forces they get using Skirmish Campaigns' system) in addition to the 4 points for the eliminated German units. The Germans will receive 2 points for those two squads that lost the close combat.

Speaking of, while I was happy with how my rules worked (especially for such a small scenario intended for individually based figures), that close combat showed me there was a problem with those rules (it wouldn't have changed anything in this case),  so I've tweaked them and I think they make more sense now. I'm feeling almost ready to share a working draft of the rules.

I plan to play the next scenario, "Ranger Relief" (which takes place June 7) soon as I've already created the map. Most likely, Sunday or Monday night,

Wednesday, June 5, 2019

The Bocage Problem

Edited for some corrections.
 
While contemplating the "Bluff at Easy Green" scenario and the possibility of following it up with "Ranger Relief" and "Grandcamp" (all from Skirmish Campaigns: Heroes of Omaha and Panzer Lehr) I started obsessing about how to handle bocage. Literally, every spare moment when I wasn't otherwise occupied, and sometimes even when I was, I thought about how best to handle bocage in a simple manner but that would reflect something of the "hedgerow hell".

I did some digging into the rules that have inspired and informed this whole process and found a variety of approaches (not addressing it all was pretty common), and then went to look and see how different board games handle it (three cheers for companies that make their rules available for free on their company websites). Finally, I even read some over-my-head discussions about Advanced Squad Leader's treatment of bocage (this article was fairly clear however).

Map for Ranger Relief (June 7, 1944) converted into a grid.
One thing became very clear: if I went too far down the rabbit-hole, I'd end up with a very complex system for handling bocage, while the rest of the rules are pretty simple.

While trying to avoid too much complexity, I also wanted something more complex than Blitzkrieg Commander's approach of "impassable to all except American & British armor from July 1944 until breached . . ." since the way the maps are drawn for the scenarios I am going to play, whole swaths of the table become inaccessible to infantry if I follow that approach.

The idea of "wall advantage" (ASL) makes sense to me - as I want some way of saying, "these units are in the bocage" and are thus treated differently than the units trying to push them out. This does require an additional marker, and I may, in practice, find the additonal marker too annoying to continue to use, but for now, it doesn't bother me too much.

Here's what I have come up with, liberally using ASL as the backbone (most of the wording is pretty generic and doesn't require knowing my rules otherwise), while trying to address some of the vagaries of the particular maps I'm using:


Bocage (Tentative rules)

At this scale, bocage is grid-space edge terrain and is shared by both spaces that share the edge.

Bocage may cover the entire edge line or part of it (half is a good representation) and while most effects are the same, there are some differences.

Movement
  • A full edge of bocage is impassible to vehicles
  • A partial edge of bocage can be traversed normally by vehicles
  • Infantry and like units may move only move 1 space, if any part of the move would involve crossing a full bocage edge. 
    • For example, if a unit wants to move into a space with a bocage edge and move a second space beyond the bocage, it must stop and wait for the next phase in which it can move.
  • Infantry and like units may move normally when crossing a partial bocage edge.
  • If the unit crosses a bocage edge, it may close assault adjacent target spaces (even if they share a bocage edge with the unit's new space).
Occupying Bocage
  • A unit that moves into a space with one or more bocage edges, may "occupy" the bocage (all edges - this is to keep things simple) provided all of the bocage edges for that space are unoccupied.
  • As long as a single unit that is not suppressed is occupying bocage, the side maintains control of the bocage for that space. If all units are suppressed, then the bocage is no longer occupied.
LOS
  • Bocage blocks line of sight through the bocage edge with the following exceptions:
    • Units in adjacent spaces that share a bocage edge may see into each others spaces.
    • Units that have occupied the bocage in a space have normal LOS extending out of the space and can be seen normally.
  • A unit in a grid space that can draw a diagonal from the center of the space, through the corner of the grid space where only one edge that makes the corner is bocage has LOS . If both edges that make up the corner are bocage, then LOS is blocked.
Example 1:
Y and Z are not occupying the bocage. Units A, C and D have LOS to the space occupied by Y and Z. Unit B does not have LOS.

Example 2:
Y and Z are not occupying the bocage. Units A and D have LOS to Y and Z. B and C do not.
Shooting
  • Bocage blocks direct fire into the grid space through the bocage edge, even if it's partial, except from adjacent spaces, unless the units in the target space are occupying the bocage. Then normal shooting rules apply. Treat target as in cover in either case.
  • A unit may fire through a bocage edge only into the adjacent grid space unless it is occupying the bocage, in which case it shoots normally.
    • In Example 1, if Y and Z are occupying bocage, then A, B, C, and D are eligible targets.
    • In Example 1, if Y and Z are not occupying bocage, then A and D are eligible targets.A and D both can claim the bocage as cover.
  • Bocage does not prevent indirect fire.
  • Indirect fire from across the bocage edge without direct observation by a Forward Observer or other eligible unit is recon by fire and is adjusted accordingly.
Close Assault
  • Units may close assault through a bocage edge.
  • If the defender is occupying the bocage, then use bocage as cover modifier, if not, use the terrain of the space the defending units are in to determine cover modifier.
It is a bit "gamey" in that you can control the bocage on all of the edges of grid-space with a single unit, which seems highly unrealistic, but given that a space is 40-50m and we dont' know where in that space a unit is exactly, to me it's an acceptable compromise, for now, between tracking exactly where units are and limiting units attacking through bocage to targeting the space on the other side of the bocage (a possibility if I find the current method too tedious after all).

I've played numerous games with my "test" setup (using printed counters on a square grid) but tomorrow night will be the first real go at a complete game for the "Bluff at Easy Green" scenario.

Monday, June 3, 2019

Stepping Away from the Grid for a Moment

No, not the power grid, the gridded wargame's table.

If you haven't heard, Warlord released a free "unofficial" squad vs squad modification for Bolt Action . This provided a bit of a kick in the paints (get it? ha!) to get started on my early war French force as some people at the "local" (I always put it in quotes because it's about an hour drive) game store will be playing it and my whole reason for even giving Bolt Action a go is to play some games with other people.

The figures (from Warlord) are quite nice with little flash - these are white metal, not plastic, which can't be said of all of the Warlord figures. The integral bases varied from barely adding any height to adding several millimeters. To avoid the "standing on a mound in the middle of a lawn" look, I decided to break out some green stuff I had laying around (several years old now) to smooth the transition.

This was my first attempt at using green stuff - it's the two strips kind (one yellow, one blue, knead together). It was harder to mix than I imagined but a few minutes searching the internet, followed by a few seconds in the microwave (the green stuff, not me) and a little water helped (again the green stuff, although I could always do with more water, too).

Here they are, still on mounds, but more uniformly so.

Soviet SMG troops look on as the green stuff dries on the French figures.
After the green stuff had fully cured (I let it go overnight), I put some texture on the bases (I don't normally do this, but I'm following a guide). I'm using Vallejo Ground Texture - a white-ish paste with pumice in it from what I understand. It's spreadable, and with a damp brush it can be almost painted where needed. Don't use too much water though or whatever the pumice is in just sort of flows away.


I let that  dry a few hours and then primed the figures with Delta Ceramcoat Hippo Grey.

A dark shadowy mass.
While priming, I found there was some flash between the helmet rim and backpack on a few of the figures, so I'll clear that out with a file and spot prime as needed, before I start in on the great coats.

I still haven't decided if I'll attempt any shading, highlighting, and all that on these figures, or go with the simpler painting style that I tend to prefer.

Saturday, June 1, 2019

Two farms and WWII on a Grid

I had some time to game Friday night and wanted to put it to good use. So, I dug around online for a scenario and found this one: Deux Farms, a fictitious scenario where a beat-up platoon is trying to hold a farm while the enemy tries to take it.

I changed the sides involved - set it in France somewhere, with the Germans holding the farm while the US advances. Both sides are pretty skimpy.

Here is the map converted to a grid layout:


For this scenario, I ruled that fields blocked line of sight, except that units in Farmhouse 2 (assuming they were on the 2nd floor) could see all the way to Woods 5, over Field 3.

As the attacker, the US set up on the South side of the board - and I chose to put the whole force in Field 1. Although I split them up into two grid spaces.

I placed the German MG in Farmhouse 2, but used blinds for the others, since I am playing solo. 

The blinds are the small green rectangles.
I apologize in advance for the length of what follows, but I've included some detail about how my grid-based WWII rules work. These explanations are enclosed in square brackets.

[I use a deck of cards for initiative, but the attacker gets a free "move" to start the game, rather than drawing a card. ]

The US rifle squads and platoon leader advance up to the edge of the fields, but the MG team lagged behind.

[Because they are out of LOS of the enemy, and will spend the entire move out of LOS of the enemy blinds thanks to the hedge in the road space North of Field 1, and Woods 1, the rifle squads can move two spaces instead of its normal one space. The MG team can only move one space regardless. The platoon leader, the single mounted figure, can always move two spaces]


The first card is 3 of Spades. The US loses the initiative to the Germans.

[An odd numbered cards means units can move, or they may fire at a disadvantage. None of the blinds, nor the MG in the farmhouse have LOS to the US units, so there's no need to fire.]

I decide that, since the US is more towards the eastern edge of the map the blind in Woods 5 will move up into Fields 3. [It moves two spaces because no US unit has LOS.] The rest stay in place.

The next card is the Jack of Diamonds. The Germans lose initiative and the face card means US units can move, shoot or both.

[I do have an "order of operations" within the phase, so if they were adjacent to the enemy and wanted to launch a close assault, or if they were going to group fire, they would have to do those first, before any individual moving or shooting.]

The MG team moved North one space, while the squad that started in that space, moved North to the road, using the hedge for cover where they came into LOS of two enemy blinds in Woods 4. One of the blinds took advantage of opportunity fire, but fortunately they had no effect on the US squad.

[Only one unit, whether a blind or not, can take opportunity fire as the result of a unit's movement.

Since I wasn't using any special AI rules, I just made them up on the spot and ruled that one of the blinds would fire, but since I didn't know which if either was real, I would only roll 1d6 instead of the usual for a rifle squad (more on that later) and in any case, I still wouldn't reveal the unit even if it hit. 5s or 6s hit and I rolled a 2.]

Not knowing where the shots came from, the rifle squad targeted the top most square in Woods 4 and opened fire.

[Since there isn't necessarily an enemy there, it's a blind, this is something akin to reconnaissance by fire in Crossfire (my rules for this are kind of fluid at this point). Rifle squads roll 3d6 to hit a unit in an open grid space and subtract one die  if the target space provides cover. So, the squad rolls 2d6. 

Fives and sixes hit, and I rolled a 5 and a 6. The two hits are ordinarily a suppression result., but when I flipped the blind over, it was a decoy. ]

The area of the woods they targeted was empty.

Meanwhile, the other two squads with the platoon leader advanced into Woods 1 and immediately came under fire from the blind in Woods 2.

[Each rifle squad in the target space is attacked separately by the single unit - the dangers of bunching up]

It was to no effect and the US squads returned fire

[Since they moved they can't combine for a group fire and have to fire individually.  Each squad scores a single hit - a pin result - but pin results don't stack, and so the second one is ignored. Had they been able to combine fire, the two hits would have yielded a suppression instead.]

The blind turned out to be a German rifle squad with the platoon leader and they were pinned.

The Germans got the next card, a six of clubs.

[On even numbered cards, units may fire, or move if they pass a morale/motivation check]

The squad in Woods 2 rallied and then opened fire on the US squads in Woods 1.

[They could have skipped the rally attempt - pinned units can still shoot. If it had failed, they wouldn't have been able to shoot. It was a gamble I took by mistake. Fortunately for them, they passed.]

They suppressed one squad [they scored two hits] and pinned the other [1 hit].

Since it's a fire card, I decided to flip the remaining blind in Woods 4 to give them their full fire dice if they were a real unit , rather than the reduced dice for the blind. It was the other rifle unit [that meant remaining blinds were decoys and were removed]. They opened fire on the US squad in the road/hedge unit to no effect.


The US squads in Woods 1 struggled to rally the suppressed unit, but the squad in the road/hedge space pinned the Germans in Woods 4.

[They did so on a move card - on a move card, a unit can still fire, but they reduce their dice by one die. Accounting for cover, the squad rolled 1d6 and hit]

This allowed the MG team a chance to move into the orchard and setup opposite the Germans.


The Germans in Woods 2 continued firing on the US squads in Woods 1, making it difficult for them to accomplish much of anything.

[Suppressed units can't do anything anyway, and I couldn't successfully rally them to save my life, let alone theirs.]


The squad in the road/hedge space moved into the orchard to join the MG, since the German unit opposite was still pinned.


Speaking of, the Germans managed to pin down the US MG on their own initiative. It would stay pinned for what seemed like forever.


The Germans on the eastern edge fell back into Orchard 1, figuring they'd draw the US squads into LOS of the MG in the farm house, which had been quiet thus far.


Since that farm house is the objective, the plan was destined to work - the US squads tried to move up but were hit by opportunity fire from the German MG.

 [Only 1 unit can opportunity fire as a result of a single enemy action, and the MG makes more sense than the rifle squad. They rolled for each unit in the target space and pinned one and suppressed the other. Units that are suppressed as a result of opportunity are forced back one space.]


The US eliminated the German squad in Woods 4, but while the rifle squad moved up, the MG was stuck due to that earlier pin result [pinned units cannot move]. It would be several more card draws to finally rally successfully.

Meanwhile, the Germans in the farm house combined fire and eliminated the US squad and platoon leader in Orchard 1

[For combined fire, each firing unit calculates their dice and then the dice are pooled and rolled together. So, in this case, the MG had 4 dice, minus 1 for the US unit being in cover. The rifle squad had 3 dice, minus one for the US unit being in cover. So, they rolled 5d6 to hit. They scored three hits and that eliminated the US squad. The platoon leader is automatically eliminated when all other units in the space are destroyed.]

The US MG and rifle squad in Woods 4 move to the eastern square of the woods, to get into LOS of the farm house, but took op fire as a result. And just like that, the US weapons team was suppressed. Just great.


My disappointment with them was short lived as they were eliminated shortly after by combined fire from the farm house, and that left two rifle squads to try and coordinate some kind of assault.


But it never materialized. In short order, the combined fire from the Germans [On two separate card draws] eliminated both rifle squads before they could even decide to fall back.

A decisive German victory.