Showing posts with label Portable Wargame. Show all posts

Monday, December 11, 2023

Two Sets of Rules, One Scenario.

I have been thinking a lot about 2024 "plans" and one of them is to do a very simple campaign set in the Lost World (formerly Venus, now Antarctica. The land itself really needs its own name used by the residents), featuring only on the fantasy/Ancients armies.

While I figure I will probably use One Hour Wargames (a mix of Ancients, Dark Ages, and Medieval troop types or the Fantasy Variant on Facebook), I do like The Portable Wargame Ancients rules and wanted to give them a go again.

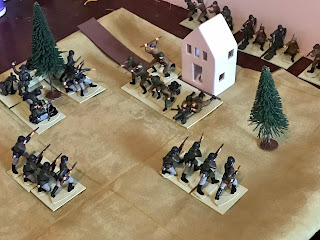
The scenario is "An Unfortunate Oversight" from OHW

Both sides deployed by die roll. I would be rooting for the Bokrug Confederacy.

24" square playing area, 4" squares. Classic rulebook in the picture shot. Imagine there is a bridge across the river on the left.

Unfortunately, following the rules-as-written meant that, if I understood them correctly, crossing the ford would take two turns per unit. This created a massive bottleneck in a way the ford does not when using OHW. I mean, sure, it's a bottleneck, but not to the extent that it is in PW. Now, I could have attacked via the bridge (which was drying as I had made an impromptu bridge from popsicle sticks), but that doesn't mean that this isn't a problem.

If I were to use PW for this again, I'd either allow stacking in a space or remove the rule about stopping when crossing a river. The latter is most definitely the less impactful.

As it was, it was extremely difficult to get more than one unit across the river before the previous units had been eliminated. 

Not impossible mind you ...

But nothing was achieved in the event.

At the game's end, the lizards had been soundly defeated and were basically halted south of the river. Fine from a narrative perspective as it may be, it was frustrating to play.

Thankfully it was quick.

So, with glue on the new bridge mostly dry, I moved back to One Hour Wargames.

Playing area is 24" square. The grid is not being used except to denote the boundary of the playing area.

Deployment was similar but not identical - determined again by the roll of the die.

Once again rooting for the lizards, this time I decided to make a diversionary attack via the bridge.
 

That worked to at least tie up both my infantry unit and the Tanitian infantry holding the town.

On the right, unlike in the previous game, my army penetrated deep into the Tanitian territory. Although it had cost me a unit of skirmishers, my cavalry and a unit of infantry threatened the hill. 

I should note, I played my cavalry extremely cautiously. I didn't want them stuck in but rather to deliver the coup de grace. This may in fact be an obvious tactic to most anyone who reads this blog, but was news to me.

Crossing the bridge was NOT going well, but more units crossed via the ford and some effective skirmisher javelins and archers had helped whittle down the defenders.

Eventually the lizards were across on both sides, but lacked anything with any punch - only two archers and a skirmish unit remained, while the Tanitians had two infantry(one near elimination) and a skirmish unit (near elimination).

Momentum (turns) was running out but there was still a slim chance the Gokrug Confederacy could pull off a win.

Unfortunately (poor die rolling on my part), although they had managed to capture the town, the hill was still contested when their momentum ran out and the attack had to be called off.

Of course, being a wargamer, I played one more turn to see what would happen and the result was the lizards lost their skirmishers and were left with two units of archers. I stopped at that point - I was satisfied that the game had played out as it had and it had come to the last few turns.

One last note, I more-and-more like the way units become stuck in hand to hand, at least for Ancients and Medieval.

I know a lot of people don't like it, but I enjoy the way it makes the choice of when to engage meaningful. Admittedly a case could be made for a rout or morale check at least to break off, but since the strength points represent morale as well as casualties, I'm content to accept that everyone routs after 15 damage. Better or worse units can have more or fewer points to start as needed. 

Not pictured, I have also done some experiments with mixing Medieval units and Ancients units and the result has been most satisfactory. Expect to see Solis Nox make an appearance soon despite not having been included in my bins for my experiment.

Tuesday, August 1, 2023

Weekend Report

For reasons I cannot discern for the life of me, I had time to play a lot of games this weekend: five, to be precise, and that's not including the multiple multi-hour sessions of D&D played with my son.

This embarrassment of riches raises an interesting question: "How many should I include in one post?"

I think we can all agree this is a first world problem, as the kids used to say.

After much thought (about 11 seconds), I realized that I don't know when I'm playing next, so I'm going to milk these games for all they are worth!

Rather than chronological order, I'm going to start with the game that accomplished something beyond game itself. It was the last game of the weekend.

 The first "game changer" (pardon me while I laugh hysterically at my own joke) is that I painted the grid you see below. I have long coveted the cream and green chess board featured in some of Bob Cordery's early grid game reports. This is my homage and budget solution - craft paints and kraft paper.

The squares are 4" and the whole thing is 24" square (which is a 6x6 grid. I only mention that for those ,who like me, majored in liberal arts and only took math because they had to). I have used a 6x6 grid with 6" spaces many many times, and while I wouldn't mind a slightly wider battlefield so flanks could mean something, I like that this 24" "board" fits on the table next to my laptop. 

As for flanks, I may borrow a page from the 3x3 Portable Wargame rules and have flanks take place off-grid.

The scenario is Take the High Ground from One Hour Wargames.The rules used were The Portable Wargame, using the two-hits option, and filtered through my memory as I couldn't be bothered to re-read them.

In my defense, I was too excited about my new painted grid.

For reasons I don't comprehend, I see the infantry as two-figure companies. The cavalry as squadrons and the gun as a battery.
 

The other notable impact of this game was that it confirmed my opinions that 1) an ahistorical 19th Century France vs England game is fun and colorful (or is that colourful?) and 2) Two large figures in a smallish grid-space gives exactly the kind of aesthetic I want in a grid game. 

I should add, as it is relevant, that I am a minimalist at heart. Or at least, I don't like having a lot of stuff. I dislike clutter (at least when it comes to storage and wargames tables. I believe when you're creating something, like painting miniatures or writing as song, take up all the space you need with all of the things). 

There's this notion of "the silent to-do list" that I find an apt metaphor. Things that I'm not using weigh on me.

Because I want to free up some storage space and Russia is slated for the chopping block for various reasons, I wanted to make sure I could still have a 19th Century European battle when desired - particularly as part of my Antarctica Lost World (if you missed those posts, it replaces Venus).

Huzzah! No need to keep the Russians or even the unit of khaki British infantry (I'm reducing the Europeans to three units plus a leader, supplemented by heroic civilian characters, often the heart of VSF gaming write-ups).

As for the aesthetics, that's a personal matter (at least in popular parlance. when i was a senior philosophy major and a grad student in philosophy, i would have been happy to argue otherwise), but as I mentioned, it's exactly the look I was going for. 

I'm tempted to try it with WWII figures, but a I tend to equate two figures with a squad. It's a me thing.

The French arrive. The battle is joined. I honestly don't recall who won.


Monday, July 11, 2022

One-Off Fantasy Battle

Yesterday, I finished painting up another 3-figure batch of the SCS Direct lizard warriors (the marine iguana themed ones). I've also been re-basing my Deetail knights individually so they can be used either on Venus or in small fantasy skirmishes. 

It seemed like a good as time as any to put a small battle on the table. The rules were the Ancient rules from Developing the Portable Wargame. The scenario was "Take the High Ground" from One Hour Wargames. The "table" is 7 grid spaces wide by 6 deep. Grid spaces are 5" square.

Deployment grid spaces were determined by die roll.

The foot knights were heavy infantry, the archers were treated as close order. The mounted knights were heavy cavalry. All foot lizards were light infantry, while the triceratops was treated as a war elephant. The spinosaurus was treated as heavy infantry with a +2 bonus in the first round of close combat, +1 thereafter.


Turn 3 or 4:  Flank attacks aplenty.

I was quite pleased both in how the game played and the look of the thing.  Unfortunately my phone died not even half-way through!

However, I did manage the classic "rule book with the table" photo before that happened:


I will undoubtedly play more games like this as my Venusians slowly build up. There'll be no painting this week though, as I'm off to Philly tonight. I plan to show my son my favorite city and gorge myself on soft pretzels and Goldberg's Peanut Chews.

For the flights, and for late evening downtime, I have some research planned: Edgar Rice Burroughs's Pirates of Venus.


It's definitely of the "summer reading" variety of research, but should provide inspiration and fodder for planning while I'm away from my toys.

Friday, January 28, 2022

Fast Play WWII 3x3 Based on the Portable Wargame

For the past few days, 3x3 Portable Wargame variants have become bit of a hot topic. I am pretty taken with the idea of a 15 minute wargame that I can set up on a corner of the kitchen table during my lunch breaks or in the evening after my son goes to bed. Very often, on weekdays/nights I have the itch to get the toys out, but I don't have time or inclination to setup a longer playing game.

While I think with a different set of rules a 3x3 grid would be good for a game with squad bases (something like a toy soldiered Advance Squad Leader Starter Kit, which I've been messing with), I think with using The Portable Wargame  as the base, and this limited board, it helps to think of these as company or higher level units so that the range limitations make more sense. 

In my case I see them as companies. My Eastern Front collection has been built up guided by the 1943 TO&E for both sides. And so, that's what I'm using to determine which units make up a battalion and therefore which kinds of companies to represent below.

Each grid space is then about 500m - 600m across. Close combat is then maybe just a bit longer than effective small arms range.

I'm using Bob Cordery's Colonial Fast Play 3x3 rules with some modifications/clarifications. You'll need both The Portable Wargame and his post in order to make sense of these.

Turn Sequence:

  1. Mortars, Panzergrenadier support companies or heavy companies, ATG may fire if not in close combat. Tanks may fire if not in close combat.
  2. Movement - reserves may move onto the table as well
  3. Panzergrenadier support companies that have not fired and are not in close combat,  or heavy companies/ATG  that have not fired or moved and are not in close combat, and Tanks that haven't  fired and are not in close combat may fire.
  4. Close Combat 

Set Up: 

I think the existing terrain systems as posited by Mark Cordone and Bob Cordery work fine for ancient or sparse areas, but I feel like a little more terrain (two to three pieces) makes more sense. After all, if we think of the 3x3 area as a section of  larger table where the battle has been joined, at least on my tables, there is more than one piece of terrain in the area. So, I'm just doing what I think looks good.

I allow up to 3 units in reserve, but require a 5 or 6 for them to enter the table. If a unit is forced back into the reserves, then they must roll again to reenter.


Unit Types:

Infantry : Move 1, Shoot 1 (Aka close combat)

Mortars: Move 1, Shoot 2, cannot initiate close combat, ie move adjacent to an enemy unless accompanying an Infantry unit, and then only as support. Fights normally in Close Combat if attacked. These are INDIRECT FIRE and can fire at targets in LOS or at a target in range that a friendly unit can trace LOS to. Cannot move and shoot in the same turn. (I am thinking maybe these should add +2 in support as well as these are the big guys, not the 50mm  ones organic to the infantry company)

MG: Move 1, Shoot 1, Fights normally in Close Combat if attacked. Adds +2 to attacker's die roll when acting in support in close combat.

MG/Mortar: Move 1, Shoot 2. The German Panzergrenadier battalion has a combined support company in 1943 on paper consisting of two MG platoons and one Mortar platoon. . Adds +2 to attacker's die roll when acting in support in close combat. Cannot shoot as mortar and then move later in the same turn

ATR: Move 1, Shoot, 1.  Tanks are treated normally (i.e. not  as in cover) Technically this is a platoon for the Soviets, 1 per battalion in 1943. I think you could make the case that they start with 1 Strength Point and not 2.

Panzergrenadier Heavy Company:   Move 1, Shoot 4.  Combined IG/ATG/Pioneer: Cannot move and shoot in the same turn, cannot initiate close combat, ie move adjacent to an enemy unless accompanying an Infantry unit. These are being used in a DIRECT FIRE role and cannot fire over intervening units or obstacles. 

ATG: Move 1, Shoot 2. Again, for Soviets, the ATG unit is a platoon , so 1 strength point is not beyond question. Cannot move and shoot in the same turn, cannot initiate close combat, ie move adjacent to an enemy unless accompanying an Infantry unit.

Tanks: I hesitate to include them but you never know. Move 2, Shoot 2. Only Infantry, ATG, Panzergrenadier heavy companies, and ATR units may destroy tanks. Always count tanks as in-cover when attacked by Infantry.


Close Combat Clarifications

5+ hits, 4 or less has no effect. It's written differently on Bob Cordery's post linked above.

All units can support each other (combined arms and all that)

If more than one adjacent square has an enemy, attacker chooses which target square is involved in the current combat and must turn to face that square (yes this puts the other enemy on their flank most likely)

After a flank attack, the defender may immediately turn and face the enemy.

If the attacker forces the enemy back or the enemy is destroyed and the space is empty, the attacking unit, but NOT support, may advance to take the emptied space.


A unit that is in support of a friendly unit during close combat does not take damage as a result of combat but must fall back with the friendly unit if the former is forced to do so. If the friendly unit is destroyed, the support unit remains in place and combat may continue into the next player turn.

Units may fall back 1 move away from close combat at no penalty. This must be back towards a friendly baseline or into reserve.

Game Length:

I think the max length should be 6 turns (double the number of turns it takes to move across the table). However, I have been having fun with 3 turns + roll 1d6. 1= game over, 2-5 = 1 more turn,  6= 2 more turns


I have found the games I've played like this rather enjoyable. There is precious little opportunity for maneuver but there are still options and decisions to make. 

In my case the setup takes 18" square and then some for the reserve, but those with smaller figures can use smaller sized grids of course.

It's easy to imagine bringing a handful of units, the grid and a bit of terrain on a vacation (remember those?) to play on a hotel room table.

Tuesday, November 9, 2021

Fictional Citadel : July 8, 1943, Part 3

On July 8th, the ground shook under the advancing Soviet 1st Tank Corps as they moved south towards Cherkasskoye in pursuit of the falling back PanGermania Division. Commanded by Divsion Commander Ouspensky, who had, since the invasion began been relatively untested, the Soviets had the benefit of three tank brigades, to the German's sole Panzer regiment.


The paper tells me the unit ID as all of my tanks look alike. All but one non-commander unit (total, counting both sides) started the battle already in a deficit of Strength Points - hence the little dice next to the units indicating such.


Unlike his Soviet opponent, General Fichte had been involved in the fighting for days. That he was forced to concede Berezovka to the 1st Soviet Guard Rifle Division, who had been supported by Ouspensky's tank brigades, made the oncoming collision a personal matter. He would command the division's PanzerJaeger battalion personally. However it was 1st Panzer Regiment that made first contact - a long range barrage that damaged several AFVs in the Soviet 3rd Tank Brigade and forcing them into a cautious defensive stance.


The German artillery advanced far to the East and set up within range of both the cross roads and the small village overlooking the bridge over the river - the Germans hoped to capture the village and the crossroad.


Ficthe had opted to keep the 1sts Fusilier Regiment in the rear to recover from their mauling the day prior. 1st Panzer Grenadier Regiment was committed to capturing the village and 1st Pioneer Battalion was sent forward to harass the Soviet right in the event Ouspensky sent his Motor Rifle Regiment forward at that spot.


The Soviet 1st Tank Brigade crossed the bridge and moved west o engage 1st Panzer Regiment and prevent the crossroads from falling into German hands.


In the event, 10th Motor Rifle Regiment advanced quickly on the Soviet right behind the 2nd Tank Brigade. Intense fighting for the village began with the German artillery reigning shells on the Soviets, followed by a German attack led by the Panzer Grenadiers, and eventually supported by the Division HQ - which Ficthe reluctantly committed to the battle due to the overall shortage of manpower and viable units remaining in his command.


Through deft maneuvering by lGerman local commanders, the 1st Panzer Regiment eliminated the 3rd Tank Brigade. Meanwhile a breakdown in command stalled the Soviets and hamstrung efforts to contain PanGermania.


Although Ficthe led from the field, himself coming under direct fire from 1st Tank Brigade when hells landed among the PAK 40 crews, Ouspensky had to be cooerced by his subordinates to make an appearance at the front.


When he arrived it was to join 1st Tank Brigade behind the hill, supported by the 1st Tank Corps recon unit. Historians continue to second guess the general's decision to take command of the 1st Tank Brigade. Ignoring that it had been forced back by accurate AT fire from both the PanzerJaegers and Panzer Regiment, without infantry support, their ability to take and then hold the crossroads was limited at best .


Meanwhile 2nd Tank Brigade and the 10th Motor Rifle Regiment engaged in a struggle for the village which the Soviets had a much higher probability of holding - and might have done so had they had the Commander's morale boosting presence.


As it was, brutal no-quarter-asked-no-quarter-given man-to-man fighting swept through the village and nearby forest, and forced the 10th Motor Rifle Regiment to abandon the village, leaving their transports behind. 1st Panzer and 1st Panzer Grenadier continued to harass the battered Soviet regiment and a last ditch effort to retake the village faltered under the lack of manpower and competent command.


Trapped in the open, they were easy targets for the German artillery. When the smoke cleared little remained of the 10th Motor Rifle.


The Soviet 2nd Tank Brigade managed to drive the PanzerGrenadiers out of the village but they were quickly replaced by the 1st Panzer regiment and the two tank units engaged in a long range exchange of fire.


With no infantry, down one unit of tanks, and with the 1st Tank Brigade on the brink of defeat, the Soviet advance could not continue and Ouspensky ordered a general retreat. (1)

Fichte having received reports from the two German divisions to the east opted not to pursue the retreating Soviets but instead held his position. It would give his men rest and allow the other divisions to advance in line.


(1) Historians suggest that it was only his personal friendships with officers close to Stalin that prevented his disposal at the hands of NKVD. In 1948, Ouspensky escaped the Soviet Union and defected to the United States. He died of entirely natural causes that should not be questioned in 1956 on his farm in rural Central Pennsylvania.

**************************

A completely surprising ending.

I thought this would be the last nail in the German coffin, but PanGermania has kept the invasion alive - or at least on life support.

I did forget that once one side reaches exhaustion you fight until the other side does as well, but in the excitement of the Germans pushing the Soviets to exhaustion (6 strength points lost in this case) while they had only lost 2 strength points, I started to tear down the table and think about the write up!

However, I think it makes more sense narratively this way.

Since the Soviets couldn't advance. the Germans could just bomb the snot out of 2nd Tank Brigade with artillery and with Panzer fire from the protection of the village. There is no need for PanzerJaeger or the Pioneers to advance any further and risk being cut up by the Soviet recon or 1st Tank Brigade, as they already had control of the crossroad.

So, if anything not attacking 2nd Tank Brigade further benefitted the Soviets.

One odd thing this game.

For the first time, I decided that a mounted unit that had dismounted and was then forced back wouldn't have time to bring their vehicles. This was wrong I think in retrospect though it mattered little in this game. The turns by my calculation are 30-60 minutes of time. And trucks wouldn't sit around in the combat zone to be shot up, they'd be at the rear already. If anything, they'd reach the fall back space first. The 10th Motor Rifle Regiment then should have 1)fallen back one space when losing the close combat 2)ended up in that space with their vehicles and 3)remained dismounted.

The biggest factors in working against the Soviets in this battle were:

  1. The Soviets only had 6 units including the commander, so they could only activate 2,3, or 4 units.
  2. They rolled terribly on my special events table (roll a d12 each turn after artillery fire and before drawing that side's card):
    • 1 -Enemy artillery fires again
    • 2 - Units in melee range of enemy must retreat 1 space
    • 3 - No movement this turn
    • 4 - No shooting this turn
    • 5-8 Nothing
    • 9 - One unit may fire twice
    • 10 - Artillery may fire again
    • 11 - One unit may move twice (including moving shooting and moving)
    • 12 - one unit regains 1 lost SP
They rolled "No Movement" three times, "No Fire" once, and "Enemy artillery fires again" . Ten turns and five of them were negative events. It definitely made it interesting!

In any case, PanGermania is doing OK but the other German units are in pretty bad shape. The Soviets, by the rules I wrote for reinforcements will slowly be able to resupply in ways the Germans cannot - particularly Soviet units on a rail space. It's just a matter of time.

That said, it's still holding my interest so I'll play another campaign turn and see what happens!

Friday, October 29, 2021

300th Post! My Portable Wargame House Rules (and bonus painting preview)

According to Blogger, this is my 300th published post. I must emphasize published. There are as of late 25 unpublished! (it used to be more)

To celebrate, I thought I'd share some of my house rules/house clarifications for Bob Cordery's The Portable Wargame (the Early and Mid-Twentieth Century in particular) that I have been using in my Fictional Citadel campaign. 

Nothing here is ground breaking but perhaps you'll get some use from them or find some clarification in your own thoughts about The Portable Wargame from these ideas.

My Turn Sequence

I wanted to preserve the two player IGO-UGO turn sequence with the simultaneous artillery fire, but make use of the suggested solo method in some way.

To do this, I keep each side's cards separate, so I can still use a die for initiative, and the cards determine the number of units that the side can activate on their half of the turn.

My sequence also means you have to choose whether or not to fire before you know how many total actions you'll be allowed in the turn. It makes for some interesting choices at times.

Preparation

  1. Each side counts the number of units they have.
  2. Using a deck of cards, one side is assigned Red and the other  Black. 
  3. Each side takes out the cards (of both suits of their color) equal to 50% of their unit count (rounded up), one less than that number, and one more than that number.
  4. Each side shuffles their cards separately - so the result is one Red deck and one Black deck.

 The turn:

  1. Artillery fire if simultaneous
  2. The sides dice for initiative, high roll wins.
  3. The winner draws a card from * their * initiative deck.
  4. The number shown is how many units they may activate. Subtract 1 if they fired artillery this turn.
  5. The remainder of the turn sequence is the same as the rules as written with the following exception:
    1. A unit may not fire and then move. The sequence is always move first, fire second. It just makes it easier for me to remember to apply the did-not-move bonus when shooting. It also prevents any move-fire-move shenanigans. (As I play solo, I know my opponent wouldn't try that, but for the rest of you there you go)
  6. The side which lost the initiative then draws from their own deck and repeats steps 4 and 5. 
  7. Check for exhaustion.
  8. If both sides are not exhausted, new turn.

Machine Guns -

To me,  rolling multiple dice and counting each hit makes them too powerful - scout cars in particular can mow down a lot of infantry. 

So, I Nerfed them - I still roll multiple dice to hit, but they can only ever inflict a loss of one Strength Point (SP) per attack.

Transports 

In the Rules as Written, I think I finally grasp the intent (the transports can be destroyed while the infantry unit carried by them could continue on foot) but I opted from the start not to count their Strength Points at all. 

The impetus for this is me not being sure if the transport is its own unit or not. It doesn't seem like it would be, but then it's stated that the transport and the unit to be loaded have to be in the same space. To me that implies, they can move independently and that implies, tenuously perhaps, the transport gets its own activation. I wanted to do away with all that.

In retrospect, it seems like I should have added their SPs to the unit total - so the units would have longer staying power. Presumably some of the hits damage vehicles then but not the troops or guns transported.

None the less, as played, in my games, the transport and the transported are the same unit - activation applies to the unit as a whole.  They do not add any SP to the totals. You do not need to keep the transport together with the transported unit, but then it's one or the other for the sake of activation.

This will be a drain on your activation as the vehicles do not count for the purpose of the unit total and thus the median Strength Points which determine the values of the cards in the deck.

Troops in Half-tracks

While troops may not have made a habit of fighting from the back of the half track, they tended to have machine guns. . Rather than worry about machine guns or rifle fire and such, instead, embarked troops may shoot or engage in close combat at all times. 

That is, they do not need to disembark to shoot or engage in close combat. This is the advantage of the half track.

Troops in Trucks -

  • Units in trucks may not shoot.
  • Troops embarking or disembarking counts as the entire movement allowance
  • They may not embark and disembark in the same turn.
  • They may not embark and move the transport in the same turn.
  •  Only disembarked troops may initiate close combat.
  •  Units on trucks may be attacked in close combat. They can defend but suffer -1 on their roll to score a hit against the enemy. This is the risk of driving trucks of troops into the combat zone.

Close combat:

When a unit enters a space that puts it adjacent to more than one enemy simultaneously: the unit may choose which enemy to face, and then the other enemy units will gain a flank bonus in close combat. The moving resolves the combats in the order their controlling player chooses.

Artillery:

There are no spotting rules and while I'm OK with this, it just seems a bit much to allow artillery to fire at targets no other unit can see, let alone fire at. 

Since the maximum range for direct fire weapons are 4 spaces, that's the spotting distance. Artillery can only fire at targets they themselves can spot or that a friendly unit can spot.

The rules state that attacking the same target gains a bonus. If what is meant by "target" is a unit, that doesn't make a lot of sense to me. Not that it's not accurate but that it's not how I conceive of artillery.

I believe it makes more sense to look at the grid space itself as being the target. That might be obvious and maybe that's what was intended by "target" but that wasn't clear to me.

******

These modifications have served me well over the course of my Fictional Citadel campaign and I feel pretty confident they don't break the game. I make no guarantees of course.

And since a blog post without a picture is like peanut butter without jelly (delicious but missing a little something), here's a completely unrelated blurry picture of a concept for one of my Venusian forces:

I'm not done with this one - the whole front of the figure, the beard ,hair, etc. needs black lining - but it is just a proof of concept. The hope is that I'm invoking Greek red-figure pottery (I know, I know, it'd be better if he was a Greek, but they are in the Hoplite tradition according to one article I dug up online). I think en masse it will be a nice effect even with my wonky little painted elephants on the shields. 

Now how to explain it in the fiction? I don't know. It's Venus, things are just weird there.

Sunday, October 10, 2021

Fictional Citadel : July 8, 1943 Part 1

General Blavatsky, 2nd Soviet Guard Rifle Division (SGRD), fresh off his victory over Phantom Division, advanced his force to meet the German 1st Panzer Grenadier Division in hopes of forcing them out of the fight and gaining the flank on Phantom Division.  The Germans, led by General Schopenhauer, had been held back since July 5th, after suffering a crushing defeat at the hands of Blavatsky's 2nd SGRD.

Both generals were intent on capturing the majority of the settlements in the area and due to their locations, it really left only Chernit (pictured as the black building below) to be contested. The Soviet 5th Rifle Regiment was tasked with the objective and made a quick advance, supported by the 2nd Sapper Battalion to their rear, and the 4th Rifle Regiment to their right. The Soviet artillery rapidly advanced to a hill within range of Chernit.


The German advance was haphazard with the 2nd Pioneer Battalion racing for the woods west of Chernit. The 2nd Anti-tank Battalion outpaced the grenadiers and were forced to halt their advance while Schopenhauer addressed the situation. Meanwhile the division's artillery deployed west of the woods nearest the road leading north to another settlement.


With the arrival of the 2nd Panzer Grenadiers a fierce battle for Chernit began, supported by artillery and the engineering battalions for both sides. While Blavatsky took personal lead of the Soviet attack, Schopenhauer took command of the German artillery.


2nd Panzer Grenadiers held off repeated counter-attacks by the 5th and 6th Rifle Regiments and the Soviets were forced to fall back and regroup.


Blavatsky's re-organized his troops to extend their ability to fight and and his inspiring speeches had remarkable impact on the forces in his command.


Schopenhauer, seeking the decisive blow, sent 3rd Panzer Grenadier to assault and silence the Soviet artillery. However, the Soviet 2nd Recon Battalion halted their initial efforts.


To the surprise of all involved, when the 3rd Panzer Grenadiers did finally make contact, they were beaten back the gun crews and forced to fall back.


The Soviet artillery, fueled by their local victory, began to find their targets with astounding accuracy. The Soviet infantry rallied to the sound of the guns and forced 2nd Pioneer and 2nd Panzer Grenadier from the field.  The Soviet recon unit made a run for the German occupied settlement to the south but was soundly destroyed by the guns of the German 2nd Anti-tank Battalion.

Schopenhauer recognized that his hold on Chernit was slipping and ordered 3rd Panzer Grenadier to take and hold the settlement.  They would make no further advance.

The Soviet infantry crashed repeatedly against the German defense. Unable to continue his attack, Blavatsky was forced to withdraw to the north.


**** Campaign Notes ****

Here is the map of the table - again, randomly generated using Bob Cordery's terrain generator - the road was dictated by the campaign map:


Barring total domination by one side over the other, I decided victory would be dependent on control of two of the three settlements. 

The Germans looked like they were gong to crush  the Soviets - having lost only 3 strength points to the Soviet 6 as late as turn 8. But then on turn 9, the Soviets won initiative  and suddenly they could not miss. The Germans went from 3 strength points lost to 7 and hit their exhaustion point. 

Luckily for them, they lost control of Chernit when 2nd Panzer Grenadier Division was destroyed, but then quickly regained possession with the 3rd Panzer Grenadier Regiment on their initiative. No more offensive movement was permitted but that worked out for them.

On the next turn, the Soviets won the initiative again, and while they inflicted some damage, they they were unable to unseat the Germans from the settlement. On their half of the turn, the Germans pushed the Soviets to exhaustion and the game ended with the Germans in control of two of the three settlements.

However, while 2nd SGRD was forced back two spaces on the campaign map, as per my rules, the Germans could not follow up on their victory as 1st Panzer Grenadier Division was found to have reached it's campaign exhaustion point even after recovering lost casualties. They aren't totally out of the fight yet - as they are on their baseline and will regain 1 strength point next turn and have 1 casualty in the hospital to dice for, and it will be two turns before they would face a threat from 2nd SGRD again 

That said, they have maybe one more battle left in them. There are two more battles to fight for July 8th and then I'll assess the German position as a whole. If Phantom loses to 3rd SGRD, that would knock out Phantom entirely, and put 3rd SGRD on the left flank of 1st Panzer Grenadier Division  and hasten their probable demise.

Saturday, September 25, 2021

Fictional Citadel: July 7, 1943 Part 2

 As PanGermania faced off with the Soviet 1st Tank Corps and 1st Soviet Guard Rifle Division (SGRD) (see Part 1),  Phantom Division found itself again embroiled with the 2nd SGRD, aided this time by the 3rd, in the region west of Yakarlevo.

The Soviets had orders to capture and hold the village (center) and settlement to its North as a way to deny the Germans this sector, while Feuerbach set his sites on capturing the two bridges that spanned the river that snaked through the region. That he should have chosen instead to capture the southern bridge and the hills flanking the road north of his position, while bypassing the northern bridge entirely, is still debated by scholars of the period.


Blavatsky's 2nd Soviet Guard Rifle Division's 4th and 5th Rifle Regiments moved quickly for the village, unaware that 3rd SGRD was facing delays in their efforts to move southwards to link up with his force. His artillery situated itself atop a hill located north of his position.


The  lead elements of the German force - 5th PanzerGrenadier and 1st Panzer Recon - secured the bridge with ease. Fate smiled on Blavatsky when 1st Panzer Recon was driven off after attempting to advance on the the 5th Rifle Regiment occupying the village - which was also serving as Blavatsky's HQ.


Feuerbach, seeing the difficulty capturing the village, kept his force west of the river and planned to approach the northern bridge from the west. 5th PanzerGrenadier, supported by 2nd Panzer, led the way, moving north of the woods, before turning west. They managed to get close enough to credibly threaten Blavatsk's artillery.


But around 11:00 AM, elements of 3rd SGRD (7th and 8th Rifle Regiment, and 3rd AT Battalion) arrived from the north on what was the flank of the western moving elements of Phantom Division. Under heavy and accurate fire from artillery, 5th PanzerGrenadier was rendered combat ineffective and. AT fire from the newly arrived forces threatened 2nd Panzer, repeatedly driving them from their protected positions in the woods.

Artillery from both sides played a significant role in the fighting that followed, with the Soviet 7th Rifle Regiment nearly destroyed under bombardment, 4th Rifle Regiment repeatedly forced to abandon its position north of the village,  and 2nd Panzer permanently forced to abandon the woods.

Although the Soviet 8th Rifle regiment would ultimately suffer substantial casualties at the hands of 4th PanzerGrenadier and the 1st Panzer Engineer battalion, it was not before Feuerbach had stretched his force beyond its limit.


Forced to fall back to at least hold the southern bridge, the Germans continued to fight but they could make no further effort for the northern bridge. Unable to unseat the Soviets from the village without great risk even the position at the southern bridge was tenuous.


Rather than risk annilhation, Phantom Division withdrew south to link up with the German 1st Infantry Division.


******* Campaign Notes ******
Once again, or if you're just joining us, this is being fought with The Portable Wargame.

This game was probably the most fun I've had this campaign. I fully expected a blow out as underpowered Phantom Division (18 strength points) was going against 24 points of Soviet might. 

When it was all over, the Germans lost 6 strength points to the Soviet's 9!

At the end of turn 8, both sides could only afford to lose two more strength points. The Soviets got the better of it though, and managed to knock out the Germans.

The downside of such an exciting game is that I got so absorbed in the game, I forgot to take pictures once things got going!

The only thing not standard in this game was a 12 entry random event table I created. Very generic with 1/3 negative events, 1/3 no effect, and 1/3 positive. Each side would roll after they turned over their card for their action points that turn.

I decided to give it the honor of rolling for each side's random events to my venerable 12-sider from my very first set of polyhedral dice acquired in 1983 or maybe early 84.

 Like all dice of the era that I am aware of, it was hand colored with the white crayon included in the package.

In any case, here's where we are at the end of campaign turn 3:


Things aren't looking good for the Germans as the Soviet wall seems to have stiffened finally.

Monday, September 13, 2021

Fictional Citadel : July 7, 1943 Part 1

On July 7, 1943 PanGermania advanced to capture Berezovka and collided with the 1st Soviet Guard Rifle Division supported by elements of 1st Tank Corps. 


The Germans advanced quickly into the town - 1st Recon followed closely by 1st PanzerGrenadiers with support from the division's armored elements. The artillery deployed on the hill south of Berezovka.


Division Commander Ouspensky provided all three of his tank brigades to General Novikov who would be commanding the attack. The three tank brigades descended on the town to meet the invader's armor.


1st Recon moved to protect the perimeter from advancing Soviet rifle divisions and 1st PanzerGrenadier was tasked with pushing back the 1st Tank Brigade. Intense fighting in the streets and alleys raged and possession of the town was up for grabs for several hours.


The Soviets 1st Guard Rifle Regiment took up positions in the woods East of Berezovka and engaged 1st Recon. From their position they were able to call in artillery support to devastating effect. Meanwhile 2nd and 3rd Rifle Regiments cautiously advanced towards the fighting via the two roads leading into the town.


In close fighting, 1st Tank Brigade managed to push 1st Panzer Grenadier South of the town. With the Germans pushed out of the fields East of the town as well, Novikov turned cautions and opted to use his armor to hold their positions while the infantry caught up.


Fichte brought up his PanGermania Fusiliers who had been held in reserve, along with the 1st PanzerJaeger battalion. The armor battle continued on the German right, and Tank Brigades 1 and 2 combined their efforts and rendered 1st Panzer combat ineffective, leaving only 1st StuG battalion.


Unfortunately for the Soviets, 1st Tank Brigade suffered extensive losses at the hand of German artillery and were forced from the field.

1st PanzerGrenadier drove the Soviets from the woods and then, along with the Fusiliers, engaged in fierce combat with the 2nd Rifle Regiment East of Berezovka.
 
General Novikov held 3rd Soviet Rifle Division in the fields north of the town in preparation to counter attack should the Germans make some headway, while sending 2nd Tank Brigade to engage the German artillery in an attempt to end their harassment.


With support from their AT battalion, the 2nd Rifle Regiment drove off the Panzer Grenadiers and engaged in a wrestling match with the Fusiliers for possession of the fields and farms.

In an effort to flank the Soviet infantry, Fichte sent his engineers to take up positions in the woods from where they launched repeated attacks on the Soviet AT battalion.


However, Fichte was running out of army to command. Although his force had caused quite a few casualties, they had taken more themselves. 1st StuG battalion made a last valiant effort to gain a foothold in Berezovka and engaged 2nd Tank Brigade in a close range shootout but were overwhelmed, they were forced back. The German attack ran out of momentum and Fichte was forced to order PanGemania's withdrawal.

Berezovka was in Soviet hands, but as the scene of most of the days fighting, it was mostly rubble.

******* Campaign Notes ******

This was fought on an 8x8 grid on my 4' x 4' table (since I was combining Soviet forces). The rules again are The Portable Wargame by Bob Cordery. The only changes I make are for initiative (i use the solo card activation rules but I don't shuffle the sides together, instead they dice for initiative and then draw from their own card deck) and MGs/Armored Cars roll 3d6, but instead of all hits counting, if 1 or more die hits, it's a single hit total.

Both armies had exhaustion points of 9SP. The game lasted 13 turns, with both sides losing 11 SP. The Soviets lost 3 of those in turn 13!

For the Soviets, just more than half of the losses came from 1st Tank Corps. Division Commander Ouspensky, already peeved that Novikov was tapped to organize the attack, is now even more annoyed. 1st Tank Brigade was completely eliminated, 2nd Tank Brigade has 1 SP remaining and 3rd Tank Brigade has 2 SP remaining.

Although I left it on the table, the 1st AT battalion only went into the battle with 1 SP and was eliminated. I had forgotten they were starting from a weakened state due to the fighting on July 5.

However, because I let the Soviets combine their force, both division sized forces are still in relatively good shape, although they must allocate recovered SP between the two units. We'll see if Ouspensky can lobby for a greater share of the replacements.

PanGermania is in bad shape despite their successful encounters on 5th and 6th of July. In this battle, Fichte lost his recon, 1st Panzer, and 1st Panzer Grenadiers, plus sustained damage to 1st StuG and the Fusiliers. That's a lot to ask of the recovered SP.

Phantom Division will face its own challenges against 2nd and 3rd Soviet Guard Rifle Divisions the next time I get a chance to play. That will be Part 2, but I don't know when I'll get to set up the table next.

Oh, and for those interested in such things, here is the map after the movement phase at the start of campaign turn 3: