Monday, February 28, 2022

All Your Base Are Belong to Us

After two years of 2" square bases with 2 figures each, I have decided it's time to change things up for my WWII Eastern Front collection.

The impetus for this was the realization that board games give me everything I want in a squad based game, with the ability to put more troops, guns, armor, and buildings on the table than I could ever manage (at least in 54mm/1/32, even with 1/43-1/50 vehicles). The other push came from basing my Venusian figures on 1.5" round bases with a single figure each. I just really like how this looks.

This still leaves questions about what kind of game am I hoping to get from this particular collection to justify it's taking up of space. 

I already have single-figure basing for Western Europe, with British paratroopers and American infantry vs German Waffen SS. Those figures are Britain and Conte, scored when I find great deals, so they are rather small forces of a squad each.  That means squad or less per side gaming. The Eastern Front has to be something larger than that as I can field slightly more than a 1:1 platoon, never mind the support weapons. If I'm only using 10 or so figures, why hold on to 3 or 4 times that?

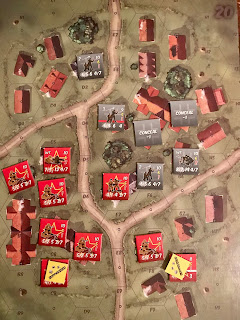
A company advances across the river - each grouping of three figures is effectively a platoon. In one of my many test games, I activated by platoon and alternated each side - keeping all platoons within 12" of the "leader" figure. I rather liked this approach as I could get a little more narrative detail like "3rd platoon advanced to the west end of the ridge as 2nd platoon secured the middle." Of course, the 10 figure unit could be a platoon and the three figure groupings squads, just change movement and weapon ranges.

A recent revisiting of Grant's Battle was particularly inspiring. I was most taken by the devil-may-care attitude towards TO&Es when equipping one's armies (admittedly this was much due to availability of suitable models when it was written as due to the author's ethos), but also the abstraction of counting one figure as more than one man. I realize this is fairly common for many gamers, but for WWII, in my own gaming, I have either done 1:1 or used trays (Morschauser's term) where the figure count was irrelevant, the tray was the thing.

In any case, this also had me contemplating Lionel Tarr's rules and Featherstone's simple WWII rules, which both treat 10 figures as a company. Grant calls his units platoons, but he's using 20mm figures and his ground scale of 1 inch = 33 1/3 yards, so to my mind that makes them more like companies. There's that nerdy obsession with ranges and unit frontages and "getting it right" (something I'm really trying to let go of).

A firefight at the village as the Germans try to weaken the defender before advancing into close contact. Meanwhile, the second Soviet company w/mg support advances towards the hill to head off the Germans advancing across the river.

Regardless of the specific figure count, this level of abstraction appeals to me as does the general nature of the "old school" approach - especially rolling to attack for each figure with the weapon they are equipped with and individual figure removal of casualties, which  seems appropriately "toy soldiery". Admittedly Featherstone and Tarr cause multiple casualties from attacks by a single figure, but they were probably using more figures than I am with 54mm figures on my 38" square card table. My 48" table may however allow me field a battalion with support and armor and I could try their mechanics as written.

The Portable Wargame also works well for me and I have come to like the look of individually based figures in a grid space for this period - at least other people's games of such - so this will allow me to achieve those aesthetics. Finally, it turns out that 6 figures placed on a 6"x 3" movement tray make a nice unit for One Hour Wargames style WWII forces (again though I prefer to treat the base as a company).

All of that said, I am going to refrain from painting the round bases any time soon. Until I've played a few more games to confirm this is the way forward (for now), I'd rather not use up precious hobby time painting the bases. I've also saved the square bases, just in case. Because I do nothing but a simple paint job on them, reattaching the figures is a quick process.

Saturday, February 19, 2022

Ghost Panzer Training Mission

This week, I had a chance to put Ghost Panzer on the table twice. I should note that I am a fan of Worthington's Hold the Line and was fairly certain even before receiving my copy of Ghost Panzer that I could trust the rules to be comprehensible and to give a good game. I was not wrong.

The first scenario is an all-infantry scenario, pitting a few German squads with HMG against a greater number of Soviet squads with an HMG battling for control of two building hexes. I played the scenario both times I played as I had made a few errors the first time.

The rules are far simpler than Advanced Squad Leader Starter Kit #1 and play a great deal faster. There is no Infantry Fire Table to consult and the rule book actually makes sense as a reference document (unlike the one which accompanies ASLSK). At least as far as infantry rules, for comparison, I'd say it's only moderately more complicated than The Portable Wargame.

The game includes a suggestion for solitaire play - which I gave a try. The gist is to use Conceal markers for everything for the opposing side, including any Decoy markers and then draw from a cup when one would be revealed. It works - if imperfectly. I may try some other ideas later, but for now I'll stick with it.

Here you can see the Germans are still mostly conceal markers Foolishly, the Soviets put their HMG on their left flank rather than opposite the objective buildings.

The German unit at the top of the map dominated the roadway, stopping multiple Soviet attempts to flank. You can see in this picture that the Soviets have made it into the destination building - the result of a decoy being present in the space. 

Morale is the driver in this game - with units having to check before attempting any action. I've played several miniatures games that do this as well, and while I find it can sometimes be annoying in a minis game to not be able to activate a unit, with a boardgame, I find builds tension and adds to the narrative. This might be a result of my fielding far fewer units generally when I play minis games.

I really liked that suppressed units could at least sometimes then, still perform an action, with no additional modifiers, if they passed their morale check. It prevents units from being dinged twice for being suppressed. Passing the morale check is good enough.

Despite this focus on morale, at the end of the turn, units that are Suppressed automatically return to normal, and units that are Fully Suppressed become Suppressed. That is, no die roll required. That might seem a little odd, given how important passing morale checks is, but in play though, it works - you just assume that the squad leader is doing their job.

End of game. Only four turns are allowed, so too much caution is costly. Then again, in trying to rush the German positions, multiple Soviet units were eliminated by Op Fire. In the end, the Germans had lost one unit in close combat (the Soviet unit was eliminated too), but the soviets had lost something like 4 and the Germans retained control of the objective.

As much as I enjoy ASLSK #1 (Residual Fire and heavy weapons breakdowns are pretty cool features)I think this game is more my speed, most of the time. Infantry combat only takes up a few pages of the rulebook - the remainder covers guns and vehicles. I'll give it a read through a few times before I try the armor training scenario. I am quite looking forward to it as I hope to be able to play the types of scenarios I could never field with 54s, even using 1/43-1/50 vehicles.

Monday, February 14, 2022

Birthday Morschauser!

Last week was my 50th birthday. I find this difficult to believe but my mom tells me it's true. To recognize the day, I thought it would be good to at least field a game of some kind. I settled on Morschauser, rules mostly as written. (Truth in reporting, I tried a more complicated set of rules for a few turns and was just not in the mood).

I rolled 1d6 per strength point, ranges were just as they appear in the book. The only exceptions were having to add mortars and modifying rolls for targets in cover, because there are some things I just have to do.

The scenario is taken from Battlefields & Warriors The fight for Figgins Farm 1863. I tried to use a similar mechanism for reinforcements - the next platoon could enter the table when the previous platoon had a squad that had lost at least one strength point. 

This worked well, although the heavy weapons were the last to arrive and barely saw any action as a result. Next time, I'd move them higher in the sequence or assign them each to a specific platoon.

The Soviets hold the farm of Comrade Figgins.

The 1st German platoon advances and fires on the defenders. They draw first blood.

The Soviet 2nd platoon arrives on the Soviet far right using the woods there to cover their advance.

The 2nd platoons engage each other while the 1st platoons battle over the farm.

The German 1st platoon takes a beating, but they weaken the defenders in the process. The German 3rd platoon advances to follow up in support.

The Germans hold the farmhouse when their heavy weapons arrive. It may be too little too late.

A swift Soviet counterattack is nearly rebuffed but, in the end, the German squad is overwhelmed.

The Soviets reclaim the farmhouse as their heavy weapons advance (see the MG and mortar in the background)

The Germans fall back and good Comrade Figgins's farm is still in Soviet hands.

The Germans were mauled - I awarded 3 points for the farmhouse and 1 point per enemy squad. The Germans lost 4 points to the Soviet 9 points.

Yes, it lacked opportunity fire and morale states, but it was simple and loads of fun. And while a relatively quick game, it wasn't over nearly as fast as you might think.

As for gifts, I picked up Worthington's Ghost Panzer as a present to myself:

ebay score, still shrink wrapped.

It's significantly less complicated than Advanced Squad Leader Starter Kit, so theoretically it will be easier to field scenarios where there is a good bit of armor on the table as well as infantry. As a bonus, the maps are mounted. Most scenarios require more than one however, so some plexiglass may be in order to keep them in place.

I hope to field the first training scenario before the month is out.

The big gift was that I forced my family and some friends to play Dungeons & Dragons with me. I ran the sample dungeon from the Holmes Basic edition book, using the Moldvay edition Basic rules. It was a resounding success, with some of the experienced gamers pleasantly surprised that role-play mattered in the dungeon and that it wasn't just hack-and-slash/murder hoboing. 

There's the possibility of a campaign now, which will start in late March probably. Once I decide whether I want to run a classic episodic game with different modules loosely linked, a single large classic module (The Lost City comes to mind), or homebrew.

Friday, February 4, 2022

Modifying Trench Hammer to Better Reflect Assault Troop Tactics

Trench Hammer does an admirable job of feeling WWI-like and not WWII-with-older-gear. Of course, we all come to our games with certain expectations and no rules can cover everything after all

Since I enjoy them enough to consider them my main WWI  rules (for now, we all know how that goes), I figure I ought to consider ways to make them more relevant to my purposes: to play toy soldiers on the Southern Front, inspired in particular in replicating the kinds of scenarios described in Hell in the Trenches (Morisi).

Yes, this was only recently posted, but I don't have any more recent pics to use here and a wall of text without some kind of picture is too scary to contemplate.

In playing Trench Hammer (see this post),  for the Italians, getting a coordinated action from all of the units (rolling high enough command points) wasn't a given, just as it shouldn't have been.  They were far less independent than the Arditi of their own army. However, the Austrian stormtroops felt only fractionally more agile than their opponent, which is a significant contrast to the history I've read.

The rules suggest that stormtroops add 1 to their command role. In my game, they had two leaders (another suggestion from the rules), but they still only roll for command points once (if I understood the rules). On average they can activate 4-5 units per turn (3-4 +1), just like the Italians. Leader figures give various advantages but not enough to make them notably more independent and flexible in response to local situations the way stormtroops are often described.

I think the way to handle that is to give each leader figure its own die for command so that, yes, sometimes not all stormtroops will act, most times they all will.

The other major missing piece, for me, was the creeping barrage. 

This was key to for the use of stormtroops, if my books are accurate at least. Following close behind the dropping shells, as soon as the barrage would lift they would be right on top of the defenders, before the latter had even even made it out of the dugouts. 

Compare that to the barrages that would lift well in advance of the troops entering the area. The Italians repeatedly did this, and the Austrian machine gunners would return to their positions and open fire on the sea of men advancing towards them.

You might argue that I am venturing away from toy soldiers into simulation. However, I believe one can still include such things and maintain an enjoyable fun game with more period flavor without unnecessary calculations. A preliminary barrage is covered by the rules and with a few tweaks can be used as a creeping barrage.

Modifications for Trench Hammer: Assault Troops vs Regular Infantry on the Defense

 1. Creeping Barrage

  • Handled after defender sets up
  • Puts the defender Heads Down
  • Kills some of the defenders - start with damage taken(Use the rules for "Artillery bombardment" from the rule book)

2. Coordination with Barrage determines starting position of attacker. 

This is the important bit - otherwise it's just a bombardment.

Early days of stormtroop use saw coordination vary considerably - and I get the feeling from having read Stormtroop Tactics by Gudmundsson, that each division had to figure this coordination out for themselves. Even later in the war, coordination was sometimes thrown off by a lack of visibility or mistakes in communication.  

Roll 1d6 to determine coordination. Add +1 to the roll for later war if you'd like to reflect more consistent coordination.

  • 1-2 Poor coordination - place attacking unit 6" + 2d6" from defender position, initiative to defenders
  • 3-4 Average coordination - place attacking unit 6" + 1d6" from defender position, initiative as normal
  • 5-6 Excellent coordination - place attacking unit 1d6" from defender position, initiative belongs to attackers
Roll for the starting position of  EACH assault unit/squad. It was not uncommon for some units to run ahead of others based on conditions the squads encountered. 
 
For regular troops following behind the assault troops,  they would advance more in a line, without getting too far ahead or behind (if playing Verdun on Steam has taught me anything about WWI, is that you don't want to do either. If you do, you'll be shot by your own side for desertion) and thus a single positioning roll for behind the assault troops applied to all regular units would be acceptable to reflect that. Say 2d6" behind.
 
If that all seems close, it's based on the suggestion in the Expansion which recommends 2d6" + 6" for a starting position for a regular sized game.

3. Assault troops receive 1 leader for every 3 units AND  each one rolls 1d6 +1 for commands available (rather than rolling 2d6 and choosing the high roll for your entire force). Assault troops will almost always act then on their own initiative.

4. Regular troops receive 1 leader for every 6 - 9 units to represent lack of authority given to individual soldiers to act on their own intiative. 

Regardless of total leader count, they still only roll 2d6 for command points and keep the high roll. The attempt is to model overall command effort required to coordinate larger numbers of soldiers and the difficulty of larger units trying to react to a threat as quickly as smaller, more agile units.

Keep in mind none of the above has been play-tested yet. I hope to stage a game in the near future to try them out.