Showing posts with label Matchbox. Show all posts

Sunday, August 13, 2023

Uniform Upgrade Mod

As I zero in on collections that work for me, I have been reviewing and thinning the herd quite a bit. While doing so, I realized that the plastic WWII figures I am keeping really needed a sprucing up. 

Many of them had never been sealed and dozens of games over the last decade had taken their toll. Plus there was some noticeably sloppy paint work. 

Finally, since some of the colors have ceased to work for me aesthetically, I decided to give them an update, too.

To see what they looked like before, here's an example.

Up first, the Germans:


If you've followed me for any length of time, or looked at the link above, you may recall that they previously had light grey trousers. I decided to go full on feld grau to better match my Britains and 21str Century pre-paints. 

It feels like I got a whole new army!


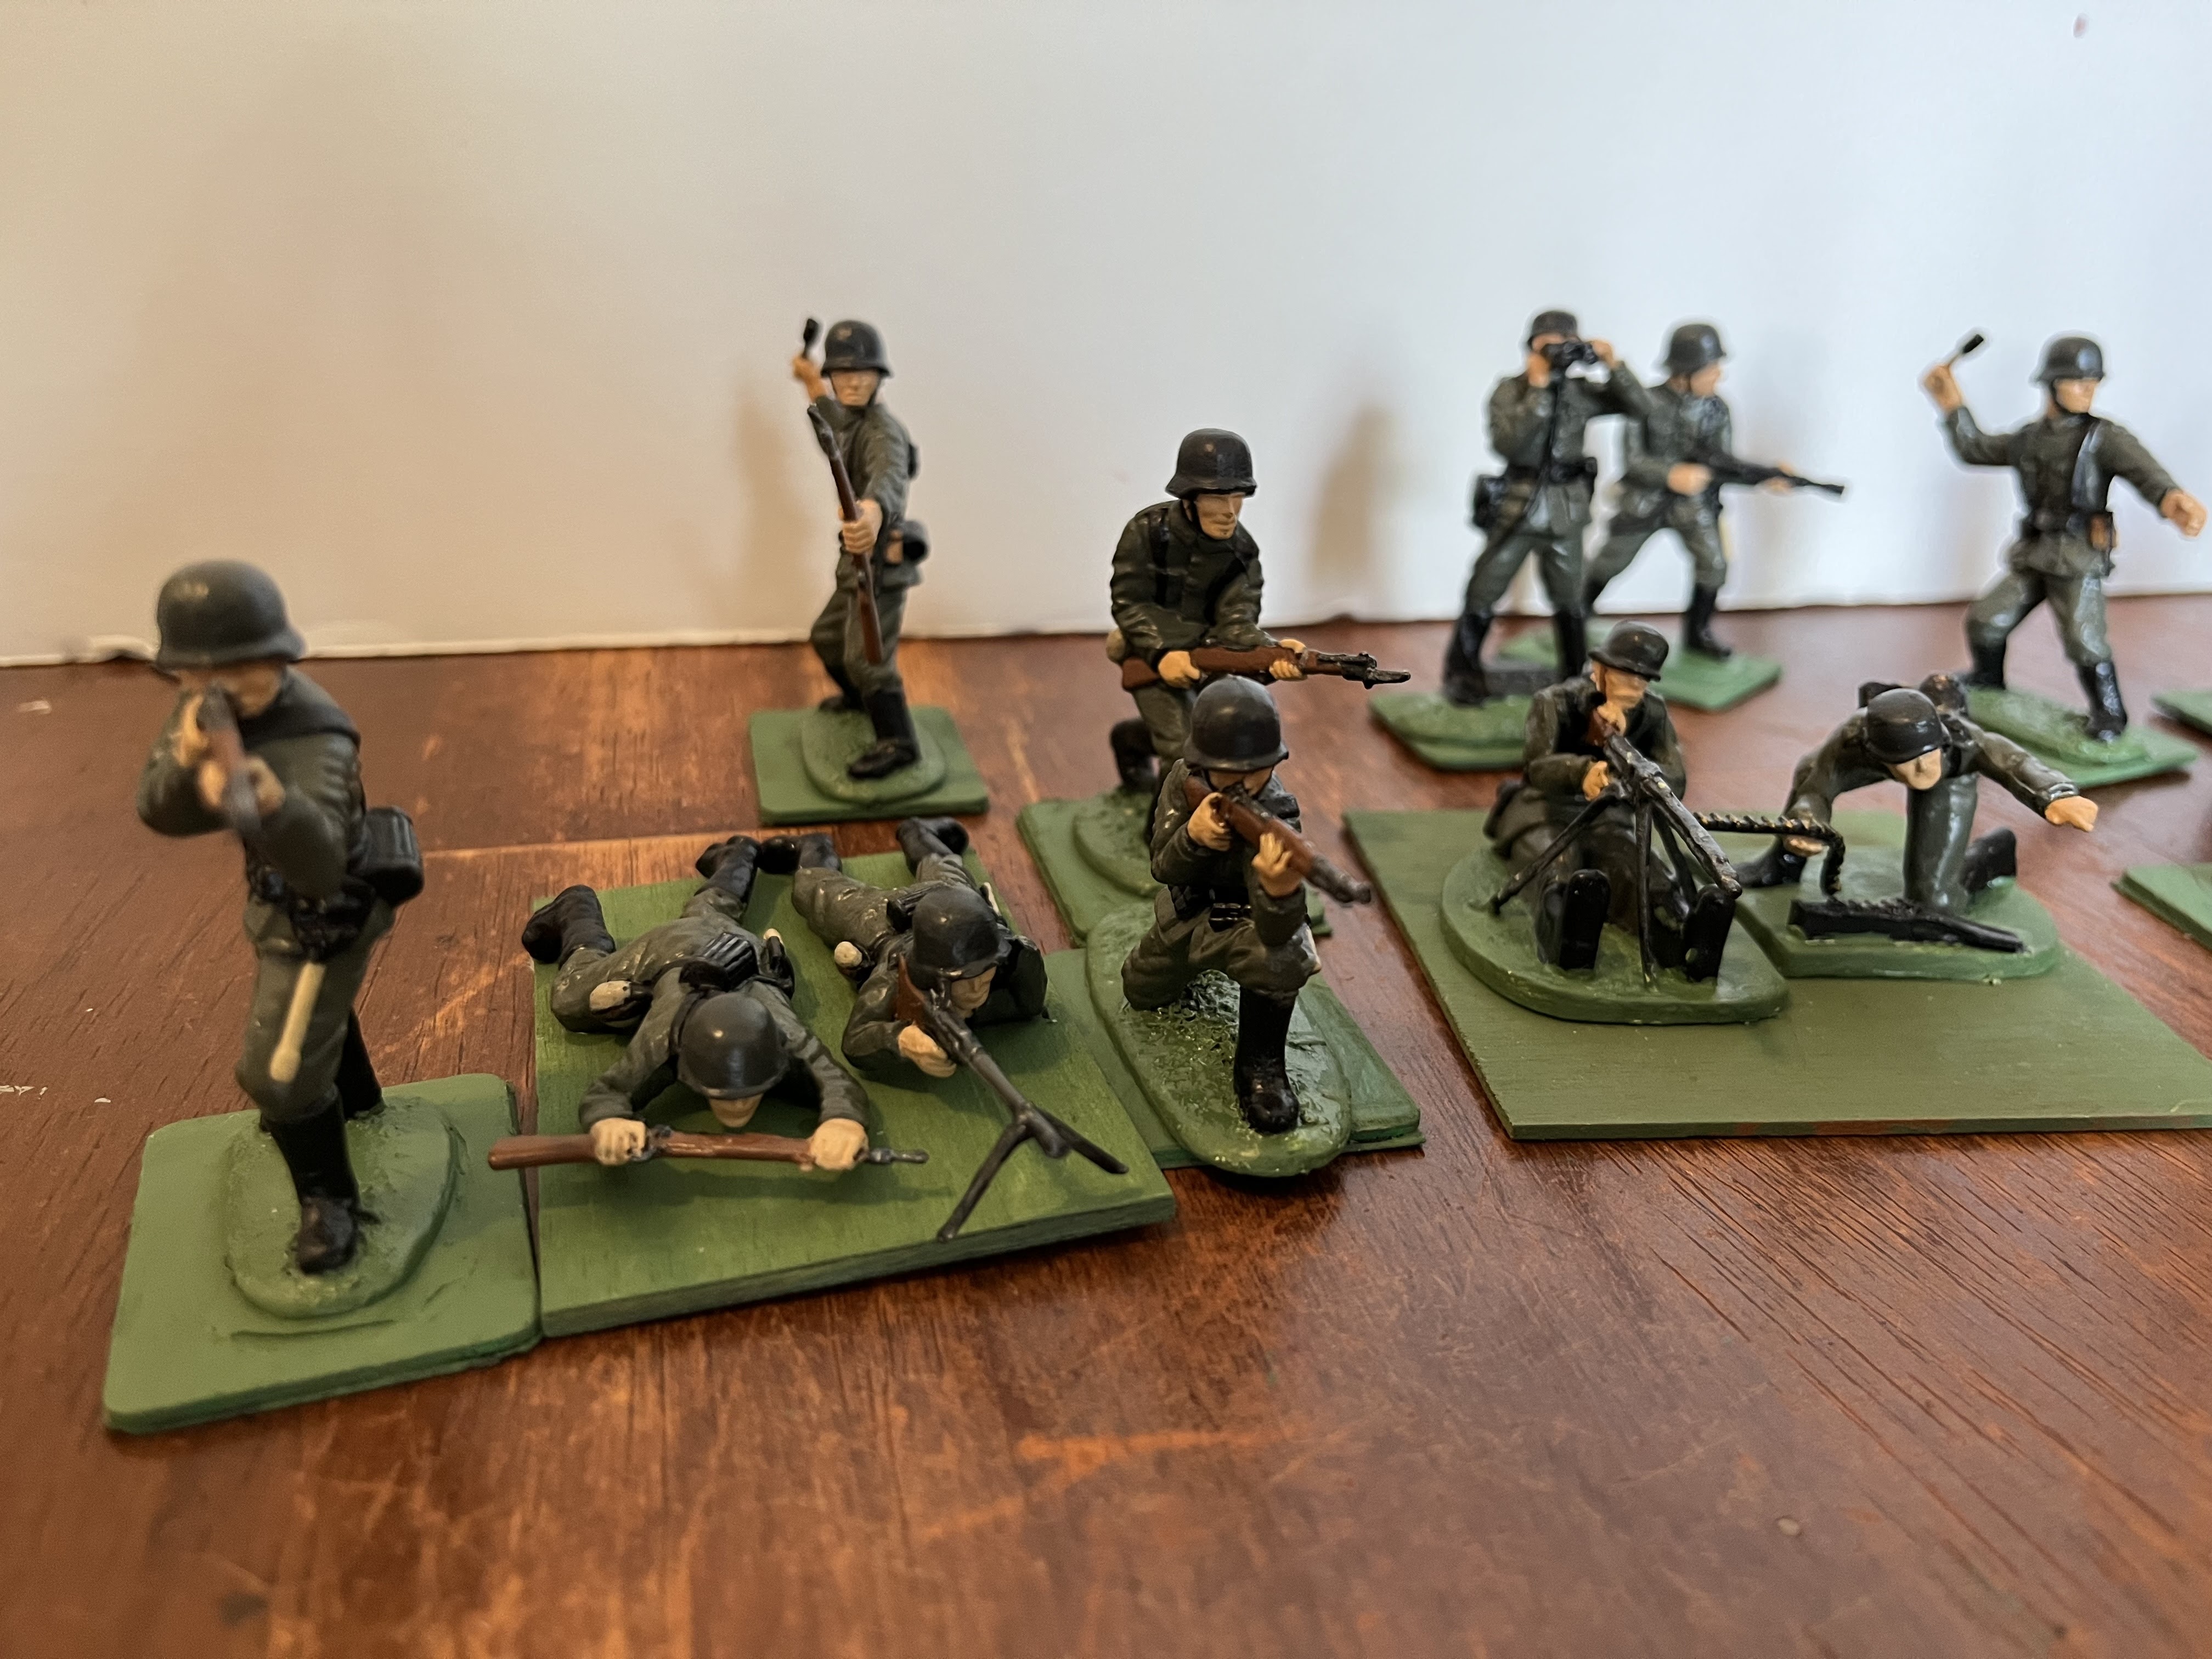
You may also notice that these are primarily Matchbox, supplemented with a few Classic Toy Soldiers figures. As much as I love the Airfix poses, I am reducing all of my forces for 1/32 WWII to 20 figures or less - the Germans have two Britains and four 21st centruy in addition to what is here. 

The Matchbox Germans were the first set of 1/32 WWII figures I got when I started wargaming.

The Americans never had as many plastic troops, as I have quite a few Britains "Big Red One" figures. 


Originally, I had tried to match the Britains color - which is close to Vallejo Middlestone - for the webbing but it was never satisfactory. I did some digging around online, and went with Vallejo Grey Green (it's the same color as my WWI Italians) and I much prefer it.

If I keep my Britain's weapon teams, they'll look noticeably different -I guess I could paint them to match the plastic figs? Or I can sell them and use the TSSD crew figures supplemented with some Classic Toy Solider crew figures.


I also painted the helmets with Vallejo Brown Violet rather than Olive Drab (I believe I had previously used Jo-Anns Olive Drab. It took like a dozen coats to become opaque) and the khaki jackets with Vallejo German Camo Beige (ironically). 

These are subtle changes but do make them more "correct" to my eyes.

A few of the Americans were given later war US Green jackets or trousers to reflect that newer troops often had the green while veteran troops had a ramshackle combination.

You may also have noticed the Americans don't have bases while the Germans do. The TSSD figures have tall integral bases and this way the Matchbox figures are much closer in height.

Hopefully, now that they are all sealed (with Mod Podge), they'll hold up for at least another decade.

The Weston Brits will be on their way into the queue, once I find the right colors - I have three Britains British WWII infantry figures (my first metal 1/32 figures) to at least try to match with them.

In the meantime, I've got 1/72 rebasing, tanks to paint, 1/35 French WWI to finish, some fantasy figures, and who knows what else.

Tuesday, July 11, 2023

State of the Painting Queue

As I've mentioned many times before, more as a reminder for my sake than for anything else, earlier this year, I put a moratorium on purchasing unpainted figures. 

What this has lead to, rather unintentionally, is renewed interest, if not enjoyment, in painting.

Perhaps I have swung too much in the "other direction" - here is my paint queue as of this morning:

For the curious, yes that is a very old Duncan Glow Imperial that I've had since the late 70s or very early 80s. I still can barely yo-yo.
 

Scales represented in that picture are 1/72, 28mm(or 32 mm?), 1/50 (the T-34 hull), and 54mm. Butterfly? Me?

I don't often share close up WiP shots, but I'm pretty excited about the progress on my Skaven Blitz Bowl team. As of last night, they are almost done with the base colors. I still have green, black, and a bone-like color to do yet (for their incisors). Then comes the wash, then a 2nd layer, and highlights.

This picture is a good deal brighter on my phone.

I'm following along with a YouTube tutorial, like I did for the human team. Same instructor - I find his instructions easy to follow, although I sometimes wish he'd show more of what he considers "armor" or where he applies a color because, as they are fantasy figures, I can't tell what's supposed to be what on these figures half the time.

It's possible I'll finish these over the weekend, but, I am also trying to ready a megadungeon-style campaign for my son (per his request) to have ready to take with us on vacation next week.

Fortunately, I really only need to have the ruins and upper level done. 

Of course, the ruins are three separate areas of multiple buildings/areas, two of which have their own mini-dungeons beneath - one connects eventually to the main dungeon. The third ruin connects directly to the main dungeon.

I'm using a number of freely available one-page dungeons to fill these areas, but I need to reskin them to the theme (Lovecraft tropes galore). The goal is to allow some exploration above ground as well as below, so he'll have choices about where to explore, creatures/NPCs to engage with, multiple ways in and out, that kind of thing.

So yeah, maybe finishing the Skaven this weekend is a little optimistic!

Saturday, October 23, 2021

Fictional Citadel : July 8, 1943, Part 2

In the predawn hours of July 8, 1943, the 4th Panzer Grenadier Regiment, Phantom Division (under the command of General Feuerbach), took up positions north east of Tomarovka. Their objective was to capture a bridge and the hills overlooking the main road to Yakarlevo,


As the sun rose, the Soviets advanced southward from their position west of Yarkalevo, carried forward by the momentum of their success against Phantom Division on July 7th. Communication difficulties due in part to physical exhaustion of the troops invovled, resulted in the 3rd Artillery Battery and 3rd Antitank Battalion arriving in positions far from their objectives. 


The Germans suffered similar command and control issues. More than once the entire division was forced to hold its position while orders were sorted out.

German engineers led off with a double move special event But the German Division would receive a No Units May Move special event twice!

The 9th Soviet Guard Rifle Regiment advanced through the woods north of the German position behind the river, which brought the German artillery under fire,  before the German crews had a chance to unlimber their guns. It would be some time before the German artillery could relocate and deploy.

"Are ze communists close or is it mein binoculars?"

At the hills, the 7th Soviet Guard Rifle Regiment engaged in a furious battle with the 4th Panzer Grenadiers, before abandoning the position for the protection of the village. The fighting continued and the 7th SGRR was soon no longer a fighting force. 

Meanwhile, the 8th Soviet Guard Rifle Regiment arrived from the north east - it's objective being the hills east of the road. A traffic jam of Soviet units presented difficulties in meeting the timetables set for their assault.


 The Soviet drive for the bridge coalesced around the advance of 3rd Recon Battalion, in support of 9th SGRR. 


Stopped first by the 1st Panzer Engineers and then Feuerbach's division HQ (the General himself was commanding from the front with the 4th Panzer Grenadier regiment), eventually it met destruction at the hands of 4th Panzer Grenadier Regiment.

The final showdown of the engagement occurred when 2nd Panzer engaged in a close range duel with the Soviet AT battalion that saw both sides break from the field.

Sensing the momentum draining from both sides, 3rd PanzerJaeger was able to secure the bridge while 4th Panzer Grenadier held the hill - tenuous though their grasp was. 

Gurdjieff was forced to concede and ordered the withdrawal of the 3rd Soviet Guard Rifle Division north, to an area just east of Systevo. Phantom Division still reeling from the effects of the previous days of fighting, found itself unable to pursue the retreating Soviets.


****** Campaign Notes *****

You will notice I forgot to take a picture of the end of the game. I was too caught up in it to remember and then I ran to take care of the bookkeeping.

This was as small battle. Not just in terms of number of units but in strength points involved.  Both sides had been pretty well beaten up previously and were not near full strength. 

Consequently it was also short. There were six  complete turns - so 3-6 hours of fighting (i figure a turn is 30  - 60 minutes).

The Germans went second on turn 6 and knowing they would be at exhaustion at the end of the turn, and having rolled a No Units May Fire special event, I charged into close combat where I could to push the Soviets to break as well. Was that gamey? Yes. Does that bother me? No. I view it as Feuerbach seeing the Soviets on the ropes and hoping to deliver the knock out blow with the last of his strength.

At the end both had reached their exhaustion points for movement on the campaign map.  As it stands, Phantom Division will need two turns on their baseline to be able to advance.

While the Germans got back 3 of their lost strength points, the Soviets had two points go into the hospital, so it's possible that 3rd SGRD will be ready to advance as early as next turn.

What remains is PanGermania vs the 1st Tank Corps. It is the 2nd time the two have met - it will be a rematch of two armored units. 

Even if PanGermania wins their July 8th battle. am not sure about the campaign going forward. At this point it's almost a guarantee that the Germans won't be able to advance much farther. Is the loss of men and machines worth it?

Tuesday, August 10, 2021

A Bridge Over Troubled Waters

Table Top Teaser #1 is one of my favorite scenarios. So I thought it'd be a good test of my Frankenstein's monster of a grid-based rule set for WW2 for 1 base = 1 company. Friday night, I broke out the card table and setup.

With a 6x6 grid, the table gets very crowded very fast despite the attacker's piecemeal arrival (the attacker has quite a few units for so few grid spaces). In my first game, several German units suffered losses very quickly due to an inability to fall back(I use the hit result table from The Portable Wargame) without colliding with another unit. But, because they have staying power, the situation didn't improve for the remaining units.

I chose to ignore the exhaustion point because had I not, the game would have been over by turn 5 or so.

Turn 6 or so - the last arrivals, er, arrive.

I reset the table and tried again using the two-hit variant for strength points originally proposed by Ross Mac and incorporated into Developing the Portable Wargame. This was a much more exciting game. The Germans still suffered some losses early but as they were eliminated whole cloth, it left breathing room for the remaining elements to maneuver. 

This isn't really an issue with the rules so much as recognizing that a large (for me) scenario in a small space, where stacking is not allowed, requires adjustments.

The Soviet defenders had lost two complete units by this point.

But on turn 10, they managed to blow the bridge . Admittedly, stranding their HMG company and a tank company on the other side of the river. Sacrifices for the integrity of the Motherland.

It occurred to me after the game, that in essence, my rules are really just a modified version of The Portable Wargame

I use a different firing mechanism (Similar to Memoir of Modern Battle (Cordery) and Hold the Line! units roll 3 dice to hit at 1 space, 2 at 2 spaces, and 1 at three or more spaces - the limit being dependent on the unit type), all hits count, hits are 4 or 6 in the open, 6 in cover, MGs hit on 2/4/6 or 4/6 against targets in cover (these are Morschauser's "to hit" numbers). Close combat is more violent than in The Portable Wargame, with infantry rolling 4 dice, and others rolling two or three, with the same hit numbers given. The number of dice doesn't change regardless of the hit points remaining. This makes close combat potentially decisive and possibly swingy even with mismatched units - closer to Morschauser (who, if it's not clear, I am a big fan of) than The Portable Wargame. There are some other rules changes that I like (units have to fire before moving, a unit can't initiate close combat unless they start adjacent to the enemy unit, and a few more).

All that said, as much as I *like* my modifications, I think I really ought to give The Portable Wargame a try again as written, but this time with the two-hit variant to see if that difference makes the rules-as-written close combat more acceptable to me.

Sunday, August 1, 2021

On the Grid Again

 Friday the dam burst and I played a flurry of games on a grid - spurred in no small part by my acquisition of a foldable card table.

It measures 38 in. square, which with my current grid cloth is still just 6x6 of 6 inch squares. But that's fine for One Hour Wargames scenarios with small forces.

I set out Scenario 14: Static Defence  - a favorite of mine  - and I tried some rules I had written up over the course of the preceding week. 

In this iteration, weapon companies were split up into attachments to rifle companies.


Soviet ATR companies can engage armor up to 1 space away. Other infantry have to close assault it.

I played two games like this. They were Ok but they weren't quite what I had hoped and had some flaws I found bothersome.  I combined them with some ideas from The Portable Wargame and tried again.

That was better but still not quite right. So I gave The Portable Wargame a chance as written - but using three hits per unit.

Soviets held off the attack on the town - which was the German target. They instead captured the hill rather accidentally.

That still wasn't quite right, for me. So, I scribbled some ideas down and slept on it.

Saturday morning, I set up a new scenario (Scenario 20: Fighting Retreat) because I needed a change from the last one.

Dramatic sunlight.

Classic Toy Solider MG team holding off the Soviet advance.

Very close to what the end of the last game looked like. The Soviet advance collapsed due to losses. I set exhaustion at 50% of strength points due to the small totals for each force.

The end result was exactly the kind of game I had wanted to play. I played twice even, just to be sure.

In the end it was an amalgamation of my own preferences, Hold the  Line, Bob Cordery's Memoir of Modern Battle and The Portable Wargame, and a little Morschauser (4's and 6's to hit and 2/4/6 for MGs).

Sunday, July 18, 2021

Operation Citadel-ish

In the mood for getting some kind of game on the table, I flipped, well, scrolled, through, my copy of One Hour Wargames and realized I could treat scenario 8: Melee as a suitable substitute for Grossdeutschland's attack on Cherkasskoye in July, 1943.

Regular readers may recall that I fought this battle as part of a campaign last year.


Panzer and Tiger units from GD advance in front of PzGrenadiers.

Elements of Soviet 199th Guard Rifle Regiment protect the hill, while others advance to meet the fascist invaders.

GD Panzer IVs were completely destroyed but GD recon unit and additional PzGrenadiers arrive to press the attack.


Two AT batteries of the 67th Guards Rifle Division reinforce what remains of the 199th.


Assault lead by Pz Grenadiers supported by recon and Tigers (off camera)


The Soviet left flank collapses under the weight of GD's advance.

Recon foolishly leads the charge to eliminate the last of the defenders.

The Soviets lose Cherkasskoye at great cost, while GD losses are minimal.

I used improvised rules based on my Division Squares: Simple WW2 Combat on a Square Grid but converted to grid-less.  The biggest changes, besides using a ruler, were that I left out leaders and artillery. 

Obviously some of the specifics of the scenario didn't match my original from last year - which I tried to base on research - the Soviets weren't dug in, there was no artillery barrage, and there was no village, but honestly, it was close enough and just as enjoyable.

Monday, March 29, 2021

Crossfire 2x2 : The River

I had another go at Crossfire this weekend. This time, I fielded a scenario that gave me fits when played with my own rules - The River. It works much better using Crossfire! As a note, my table is 3x3, because the bases are 2" x 2", which is slightly larger than standard.

Pictured below is the second game - the first wasn't supposed to happen, I was just setting up the table late Saturday night, in advance of Sunday's game, and thought, "Well, maybe I'll just move some stands around for fun." Before you knew it, I had played an entire game.

 The Germans got off to a poor start - no smoke landed and their recon by fire failed.

So the Soviets popped up with their MG and started firing. Fortunately for the Germans they were mostly ineffective.

After several short initiatives of failed smoke arrival, the Germans managed to land some which allowed the river crossing to begin. That brought the Soviets in the bunker into the action.

The German engineers walked right into the minefield and started clearing it. Fortunately the Soviets in the bunker were incompetent.

I didn't feel like getting out the cotton batting to set up the smoke so I used these "markers" I created years ago. I think they fit the look of my table.

With the mines cleared, and with some help from their 50mm mortar landing smoke,the Germans were waded their infantry into the river.


 The Soviet mortars gave the attackers some trouble when the smoke cleared

But using the woods as cover, the Germans were able to storm the building. Fierce close combat followed. In the end, the defenders were wiped out to a man: heroes of the Motherland, all.

I used the Bogged Down markers to indicate "no fire".

The Soviet FOO and mortar turned their attention to bombarding the formerly-held building.

While the Germans launched an attack on the bunker, supported by their mortars.

Having cleared that obstacle, they moved on to capture the Soviet FOO and wipe out the Soviet mortar in close combat.

End of the game,the Germans held the objective and the Soviets were completely eliminated.

As a solo game, Crossfire, like most games, works well- although the hidden units in these scenarios takes a little effort to setup in a satisfying way. I think the hardest part about solo play with Crossfire is the need to always be aware of when the inactive side has an opportunity for reactive fire. Unlike some games, where a missed opportunity for reactive fire isn't the end of the world, in Crossfire it's the difference between stealing the initiative and not getting a chance to be the active side.

The solo player is forced to dedicate some brain power to examining every action from the perspective of both sides. It's not insurmountable, and I find the mental involvement enjoyable, but I can imagine some solo players would find it less so.

Wednesday, December 9, 2020

Counter-Attack! (One Hour Warames Scenario 18)

The Soviets hold the village and are advancing to take the bridge. Meanwhile, the Germans, holding the bridge with a small force, are organizing a counter-attack, with the intent to capture the village. Unbeknownst to the Soviets, the Germans have identified two fords by which they can cross the river.

Soviets: 3 infantry, 2 ATG, 1 mortar

Germans: 3 infantry, 2 mortar, 1 tank.


A lovely day for a battle.

Soviets send two of their infantry and an ATG to take the bridge.

The ATG has an advantage of range but their aim could use some work; the German defenders avoid any serious casualties.

I just like this picture of the ATG deployed.

The ATG calls in a mortar strike which is much more successful - the bridge defenders are in disarray.

They hold on long enough for the main force to arrive.

A battle for the bridge ensues.

The Panzer unit engages Soviet infantry at the bridge, supported by mortar fire, while German infantry cross the ford.

The Soviet reserves look on towards the sound of battle, waiting for their moment.

The village defenders pre-register targets on the road in the event of a Panzer break through at the bridge.

The lead ATG  unit prevents that possibility - disabled tanks litter the road to the bridge.

German infantry across the river.

Both sides infantry are too far apart to engage, so mortar fire plays the biggest role.

Things don't look good for the Germans - cohesion and combat efficiency toes the breaking point.

However, effective mortar fire and an incredible effort by the officers pushes them onward behind the creeping fire of the two mortar units. The Soviet infantry breaks and quits the village, the ATG unit abandons their guns, and the mortar unit outside of town, at full strength and having a banner day, is forced to concede without any meaningful way of staving off the Germans.


*****

Rules used were my own Modified Morschauser modern rules (linked in the side bar). The scenario is from Neil Thomas's One Hour Wargames - modified to fit on a 4' x 4' table (plywood on a bed). This was the first time where mortars played a decisive role in one of my games with these rules - in a way they typically do with NT's own WWII rules from OHW

I may have given the mortars too many strength points - 3 points each. That's what I've been doing, but I wonder if it should be more like the ATG, tanks, howitzers, etc. and only have 2? I'll think more on that.