Showing posts with label grid games. Show all posts

Monday, December 11, 2023

Two Sets of Rules, One Scenario.

I have been thinking a lot about 2024 "plans" and one of them is to do a very simple campaign set in the Lost World (formerly Venus, now Antarctica. The land itself really needs its own name used by the residents), featuring only on the fantasy/Ancients armies.

While I figure I will probably use One Hour Wargames (a mix of Ancients, Dark Ages, and Medieval troop types or the Fantasy Variant on Facebook), I do like The Portable Wargame Ancients rules and wanted to give them a go again.

The scenario is "An Unfortunate Oversight" from OHW

Both sides deployed by die roll. I would be rooting for the Bokrug Confederacy.

24" square playing area, 4" squares. Classic rulebook in the picture shot. Imagine there is a bridge across the river on the left.

Unfortunately, following the rules-as-written meant that, if I understood them correctly, crossing the ford would take two turns per unit. This created a massive bottleneck in a way the ford does not when using OHW. I mean, sure, it's a bottleneck, but not to the extent that it is in PW. Now, I could have attacked via the bridge (which was drying as I had made an impromptu bridge from popsicle sticks), but that doesn't mean that this isn't a problem.

If I were to use PW for this again, I'd either allow stacking in a space or remove the rule about stopping when crossing a river. The latter is most definitely the less impactful.

As it was, it was extremely difficult to get more than one unit across the river before the previous units had been eliminated. 

Not impossible mind you ...

But nothing was achieved in the event.

At the game's end, the lizards had been soundly defeated and were basically halted south of the river. Fine from a narrative perspective as it may be, it was frustrating to play.

Thankfully it was quick.

So, with glue on the new bridge mostly dry, I moved back to One Hour Wargames.

Playing area is 24" square. The grid is not being used except to denote the boundary of the playing area.

Deployment was similar but not identical - determined again by the roll of the die.

Once again rooting for the lizards, this time I decided to make a diversionary attack via the bridge.
 

That worked to at least tie up both my infantry unit and the Tanitian infantry holding the town.

On the right, unlike in the previous game, my army penetrated deep into the Tanitian territory. Although it had cost me a unit of skirmishers, my cavalry and a unit of infantry threatened the hill. 

I should note, I played my cavalry extremely cautiously. I didn't want them stuck in but rather to deliver the coup de grace. This may in fact be an obvious tactic to most anyone who reads this blog, but was news to me.

Crossing the bridge was NOT going well, but more units crossed via the ford and some effective skirmisher javelins and archers had helped whittle down the defenders.

Eventually the lizards were across on both sides, but lacked anything with any punch - only two archers and a skirmish unit remained, while the Tanitians had two infantry(one near elimination) and a skirmish unit (near elimination).

Momentum (turns) was running out but there was still a slim chance the Gokrug Confederacy could pull off a win.

Unfortunately (poor die rolling on my part), although they had managed to capture the town, the hill was still contested when their momentum ran out and the attack had to be called off.

Of course, being a wargamer, I played one more turn to see what would happen and the result was the lizards lost their skirmishers and were left with two units of archers. I stopped at that point - I was satisfied that the game had played out as it had and it had come to the last few turns.

One last note, I more-and-more like the way units become stuck in hand to hand, at least for Ancients and Medieval.

I know a lot of people don't like it, but I enjoy the way it makes the choice of when to engage meaningful. Admittedly a case could be made for a rout or morale check at least to break off, but since the strength points represent morale as well as casualties, I'm content to accept that everyone routs after 15 damage. Better or worse units can have more or fewer points to start as needed. 

Not pictured, I have also done some experiments with mixing Medieval units and Ancients units and the result has been most satisfactory. Expect to see Solis Nox make an appearance soon despite not having been included in my bins for my experiment.

Thursday, November 16, 2023

Battle of the Alps Squared

June 1940, the Italian army, ordered by the outsized ego of Il Duce - who was desperate to have a piece of France before Hitler had captured it all for himself -  trundled across the northern alpine border into France.

The stalwart defenders of ennui and champagne had expected as much and were dug in and ready.

The Italians used the woods to cover the left wing of their advance.

The French infantry were well dug-in and extricating them proved more difficult than discretely hiding ten pounds of good salami into your rucksack.

Calling a meeting of L3s with the FT17s a "tank duel" or a "clash of armor" stretches credulity. Let us say, they fired shots at each other while snacking on loaves of bread and drinking bottles of wine, with the wine merchants being the real winners, judging by the ineffectiveness of both sides.

Eventually the French armor, despite damage incurred from the Italian battery - drove back their Italian opposites - can you blame those poor Italian pilots? They only learned to drive the L3 a few days ago. 

It was all for naught, as they were just in time to find the Italian infantry had successfully captured the village. A halfhearted attempted to dislodge the Italians met with no success.

The French had run out of time and would have to fall back. Here is the battlefield at the end:

The scenario was "Late Arrivals", a favorite of mine from One Hour Wargames. It works equally well for Austrians streaming into Italy as it does for Italians invading France. The game lasted the OHW standard 15 turns. 

The rules were improvised, based on my own squad-per-base rules - a mash of Crossfire, Advanced Squad Leader Starter Kit, and The Portable Wargame - but moved up a few levels of organization and no stacking allowed. I also used ideas borrowed from Ross Mac's Fast and Furious Fifties

Initially I thought of the units as companies of infantry, platoons of tanks, three or so guns, etc. 

However, while writing my narrative it didn't really seem to matter and I could just as easily think of them as battalions. I hear Memoir '44 is a bit like that - where the nominal scale changes based on the scenario? I don't know, I've never played it, but that's my understanding.

It seemed to work here at least.

Saturday, August 26, 2023

A Little PTO


Marines land on a godforsaken island somewhere in the Pacific.

The view up the beach.

Maries take cover at the log wall (I forget what they are called)

The beloved company commander hits the beach.

Losses are heavy but a platoon, or what's left of it, manages eliminate the enemy protecting the bunker's flank.

It's not going well for the Marines over all though.

The PL and a single squad assault the bunker.

And capture it!

Is the tide turning?

The Marines consolidate and roll up the Japanese positions.

The Marines on the beach are still taking a hammering.

The Japanese mortar crew retreats to the bunker - the Marines are coming!

The Marines mass and assault the remaining bunker on this stretch of the landing zone.

We interrupt this game report to share with you the pitiful die rolls each side made for their close combat. The 1 is the Marines. The only saving grace is they get bonuses for the PL, CC, and more than one squad.

The bunker is captured! This sector is secured!

Rules used were my own - a combination of Crossfire, Advanced Squad Leader Starter Kit, and The Portable Wargame.

The turn sequence is as follows:

Side A Phase 

  1. Side A Rally
  2. Side A Prep Fire
  3. Side A Move - except those who Prep Fired including reinforcements arrival.
  4. Side B Defensive fire
  5. Side A Advancing Fire - fire with penalty, and only those units who did not fire in Prep Fire
  6. Side A Assault Move 
  7. Resolve Close Combat

Repeat, sides reversed for Side B phase.

I've been messing around with these for a few weeks now, and I think they are usable as is, although I'm sure I will tweak them (and add armor eventually). My plan is to use them for a fictional Pacific Island assault. Possibly using The Isle of Dread (D&D module X1) as the island in question.

The thing I'm most happy with is the way movement and Defensive Fire work to mimic overwatch/opportunity fire without having to simultaneously play both sides. Since I play solitaire, I don't like having to keep an eye out of Opportunity Fire for the other side. All movement is one grid space and allowing units to move 1 space, then defensive fire, and then eventually move one more space means the effect is the same as overwatch/etc., but I don't have to switch back and forth between the sides while I move a unit.

I've played this scenario several times - the USMC wins most times, but at a high cost, which seems right. In this case, they lost over half of their rifle squads.

For this game, I set a 12 turn limit and the game ended on turn 10.  The Japanese had a platoon of three  rifle squads, a knee mortar squad, and a Platoon Leader. They also had two MGs in bunkers. The USMC had a company consisting of three rifle platoons (and their PLs), and a company commander. The heavy weapons teams were ignored and assumed to be functioning as riflemen in the CCs squad. I probably could have rolled them up into an extra single rifle squad (figuring some of the men are carrying mortars and MGs and can't fire their rifle, only run) on the table and might do that next time.

It really looked like the Marines were going to be slaughtered before they got off the beach, but that's why you never give up on the Marines!

Tuesday, August 1, 2023

Weekend Report

For reasons I cannot discern for the life of me, I had time to play a lot of games this weekend: five, to be precise, and that's not including the multiple multi-hour sessions of D&D played with my son.

This embarrassment of riches raises an interesting question: "How many should I include in one post?"

I think we can all agree this is a first world problem, as the kids used to say.

After much thought (about 11 seconds), I realized that I don't know when I'm playing next, so I'm going to milk these games for all they are worth!

Rather than chronological order, I'm going to start with the game that accomplished something beyond game itself. It was the last game of the weekend.

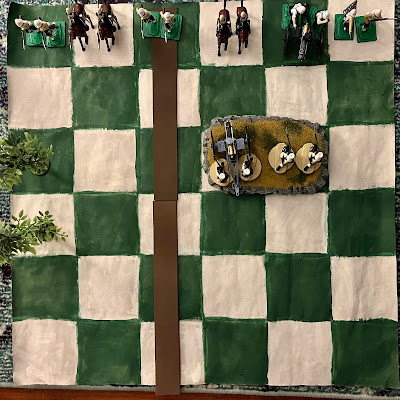
 The first "game changer" (pardon me while I laugh hysterically at my own joke) is that I painted the grid you see below. I have long coveted the cream and green chess board featured in some of Bob Cordery's early grid game reports. This is my homage and budget solution - craft paints and kraft paper.

The squares are 4" and the whole thing is 24" square (which is a 6x6 grid. I only mention that for those ,who like me, majored in liberal arts and only took math because they had to). I have used a 6x6 grid with 6" spaces many many times, and while I wouldn't mind a slightly wider battlefield so flanks could mean something, I like that this 24" "board" fits on the table next to my laptop. 

As for flanks, I may borrow a page from the 3x3 Portable Wargame rules and have flanks take place off-grid.

The scenario is Take the High Ground from One Hour Wargames.The rules used were The Portable Wargame, using the two-hits option, and filtered through my memory as I couldn't be bothered to re-read them.

In my defense, I was too excited about my new painted grid.

For reasons I don't comprehend, I see the infantry as two-figure companies. The cavalry as squadrons and the gun as a battery.
 

The other notable impact of this game was that it confirmed my opinions that 1) an ahistorical 19th Century France vs England game is fun and colorful (or is that colourful?) and 2) Two large figures in a smallish grid-space gives exactly the kind of aesthetic I want in a grid game. 

I should add, as it is relevant, that I am a minimalist at heart. Or at least, I don't like having a lot of stuff. I dislike clutter (at least when it comes to storage and wargames tables. I believe when you're creating something, like painting miniatures or writing as song, take up all the space you need with all of the things). 

There's this notion of "the silent to-do list" that I find an apt metaphor. Things that I'm not using weigh on me.

Because I want to free up some storage space and Russia is slated for the chopping block for various reasons, I wanted to make sure I could still have a 19th Century European battle when desired - particularly as part of my Antarctica Lost World (if you missed those posts, it replaces Venus).

Huzzah! No need to keep the Russians or even the unit of khaki British infantry (I'm reducing the Europeans to three units plus a leader, supplemented by heroic civilian characters, often the heart of VSF gaming write-ups).

As for the aesthetics, that's a personal matter (at least in popular parlance. when i was a senior philosophy major and a grad student in philosophy, i would have been happy to argue otherwise), but as I mentioned, it's exactly the look I was going for. 

I'm tempted to try it with WWII figures, but a I tend to equate two figures with a squad. It's a me thing.

The French arrive. The battle is joined. I honestly don't recall who won.


Wednesday, August 18, 2021

More Portable Wargame and Campaign Thoughts

For giggles, I broke out my 1/50 or thereabouts armor and played an inaugural game on my 5" grid cloth - a replay of Tabletop Teaser #3. It was also the first appearance in a game ever of my Churchill (lend-lease, like the jeep).

Overview of the armies arriving.

So many Soviet infantry yet there were not able to hold off the Germans.

Oh what's this? Another lend-lease vehicle.

Germans hold off the final Soviet push for the town.

The Germans held the bridge and the town quite securely at game's end.

I used the card activation method described in The Portable Wargame (PW) which made for an interesting piecemeal arrival on the table and having to choose whether to bring on a new unit or press home with those on the table.

Satisfied with the 5" grid (and I still have the 6" grid) and The Portable Wargame generally (although I still think shooting should be prior to movement and I may tinker a bit), I turned my thoughts to a possible mini-campaign - a fictionalized Operation Citadel. 

I was inspired by Bob Cordery's most recent approach to his Great Patriotic War campaign (the Red Flags & Iron Crosses campaign).  I want to use PW to play it out but it occurred to me that if the units are regiments then the ranges in The Portable Wargame are way too long.

So I tried a game where only artillery has any ranged attack. It resulted, perhaps not surprisingly, in something of a scrum. For one, there may have been too many units on the table for using full strength points (because I like the idea of tracking SP through the campaign although it can be done with the two hit variety the more I think about it) and for another, if everything has to close for combat, well, eventually it's a pileup.

I reset everything and played again but with the regular PW rules and it was much more enjoyable even if it stretched credulity. I may retry the adjacent space only rules with some slight modification, but I may not. It's toy soldiers after all, not a detailed simulation. I also may limit how many units a division can field in any given battle - to prevent too much crowding.

The pictures below show the PanGermania Division in battle against elements of the 1st Soviet Guard Rifle Division (the remainder of the Soviet division I reasoned was otherwise engaged - a test of an idea for how I'd start my imagined campaign). The grid uses 5" squares.

1st Fusiliers regiment , 1st Panzer regiment, and 1st Assault Gun battalion, approach as members of the Soviet AT battalion reconsider their life choices. (Vehicles in a multitude of scales)

The Germans reach Cherkasskoye as they hit their exhaustion point. The Soviets are in no condition to maintain fighting and fall back.


Monday, August 16, 2021

A Tale of Two Portable Wargames and Smaller Grid Space

For some time, I have been contemplating the benefit of a smaller square for my grid. 6" feels right, but limits the grid to 6 x 6 most of the time (It can go 8x8 on my 4' square plywood, but I can't easily set that up and leave it out). 4" doesn't look quite right with the large scale CTS armor, and is a bit small even for 1/43-1/50 vehicles, although it has the benefit of a 9x9 table. 5" allows me to go with 7x7 (4.75 would give me 8x8 on my card table, but I don't feel like messing with fractions when measuring).

So, Friday, I painstakingly set out little stones to indicate 5" squares and setup Tabletop Teaser #1 (yes, again). For some ambience I kept the lights low and used the light from my little houses:

Soviet infantry and HMG companies guard the town while their commander entertains a visitor.

I turned the overhead light on to get a picture of the entire table.

The commander, furious about all of the noise that has ruined his evening, comes out to find the Germans at his doorstep.

The Germans managed to capture the bridge before the Soviets had a chance to blow it up. The 5" grid seemed to work well enough.

Was it better than the 6x6 game? Not significantly.  

However, it did allow me have a little more space to maneuver, for units to fall back to avoid taking damage, and turned a one grid space woods into a three grid space woods, which I rather liked. However, in terms of fun, I think it was about the same. Then again, I have fun just pushing figures around my table next to my laptop and rolling dice, so my standard is pretty low.

Next, I set out Tabletop Teaser #3, The Advance Guard Action,(available here) to try out the smaller square/more squares further. I had never played this one before which made it harder to judge the impact of the grid. 

The sides have identical forces but at "mid-day" they may receive reinforcements.

The Lend-Lease recon unit is visible on the Soviet side.

German motorised infantry race for the town.


Each side has reached its primary objective and threatens the enemy at the other.

The Soviets assault the German defenders in the town. A rather uninspiring picture of a tank battle.

The struggle for the town.

The Soviets force out the Germans and get comfy.

The German attacks on the Soviet positions near the bridge are repelled and the Soviet infantry occupies the cover of the woods.

The German reinforcements arrive.

But are outgunned by the Soviet reinforcements.

The Germans are running out of steam and have neither objective in hand.

Although their armor was able to drive the Soviet armor out of the town, they were flanked and destroyed by the second Soviet armor unit. Their force whittled to nothing, they abandoned the field.

The Germans had very little success in this one and when they reached their exhaustion point it really was the end for them - as by that rule, they couldn't advance to either objective. The Soviet T-34 reinforcement drove the last nail in.

This scenario definitely benefited from the extra squares - motorized infantry (subbed in for the light infantry) and recon units (light cavalry) chew up ground quickly.

The only time I really felt the smaller space was off was when enemy tanks faced off in adjacent spaces - their butts had to hang into the squares behind them even as their fronts nearly touched. Still, a minor inconvenience, and I do have a number of 1/50 scale tanks (just not for the Soviets although I have finally found some reasonably priced sources for resin prints of them) if it really bothers me. 

Is it worth sacrificing a few feet of my ground cloth to make a second grid cloth so I don't have to put out little stones? I think so. So, that's next on the docket.