Wednesday, January 30, 2019

WWII Divisional Battles Using Squares : Take 2

 Unwilling to let sleeping dogs lie, I did some digging into a variety of free rules, and found most all of what I was looking for in the PZ8 WW2 Divisional Level Wargame Rules (you have to page through a bit to find them).

Like many of hobbyists, I download a lot of free wargame related things, and it turns out I already had a copy of this document from several years ago! Oh well, better late than never.

To meet my needs, I converted it to squares - because I want to use squares. The exact measurements for movement, artillery, spotting, etc. are up in the air yet as I tweak it, so I'll hold off on my exact conversions until they are settled. That said, one square = 1 km.

On a break today, I set up the same scenario as the other night, with each side getting a divisional HQ as well, and gave it a go.

The first and second turn started with the German retreat, per the scenario setup - with one battalion of infantry stuck south of the river (I ignored the scenario rules calling for the destruction of any red army unit south of the river after turn 2 because the Germans had 5 units this time, instead of 4.).

On the second half of turn two, the three battalions of US infantry, supported by two battalions of tanks and an artillery battalion?regiment? arrived on their base line (squares determined by die roll).

The US tank battalion on the left quickly made contact with the stranded German infantry, driving them back, while on the US right, the German infantry on the north side of the river destroyed a US battalion (pushed it back two squares, right off the table).

A few turns in, the US is down one battalion already.
Word to the wise, be careful of putting units behind other units, as you risk blocking a push back result and losing your unit.
After struggling to get across - and losing another infantry battalion in the process - it looked like the US left had a foothold north of the river, with the tanks barreling onward to overrun German artillery positions.

You would be forgiven for thinking the tanks would win this fight.
 Unfortunately, the tanks were trapped at the waters edge and decimated with brutal precision.

On the right things picked up and tanks and infantry made it across the river, but it was too little too late. Despite eliminating one German battalion, the German Divisional HQ was far more efficient with their resupply and kept the remaining units in good order, while giving their artillery many more fire missions than the four allotted at the start.


Moments after this was taken, the US infantry in the woods to the top right were forced to fall back (again, off the table). With 50% of US combat units gone, I called the game.

Impressions:

THIS is what I was looking for the other night.

Despite being a small game (a regiment vs an under-strength regiment) the rules worked well and it felt "right". The game had a Little Wars quality to it, as infantry / tanks don't distance fire, they have to move into contact (adjacent grid spaces), and only artillery "shoots".

I really like the resupply rule (obviously you can do that with other rules) - it's simple and I used it as written, once I remembered to use it.

Being pushed back is devastating - need to pay attention to who is where before an attack.

Some options to consider  - supported attacks, attached companies, unit stacking?

The Pz8  rules say they are based on the KISS Rommel rules, and I've downloaded them to mine for ideas. Similarly, I found De Belli Mundi Secundus (a DBA variant for the same scale game) and they too look to have some bits and bobs I want to make use of.

Tuesday, January 29, 2019

Alas, This Last Reincarnation Did Not Run According to Plan

The opportunity to get figures on the table escaped me on Sunday, but last night I had a chance.

With limited time, I set up scenario 20: Fighting Retreat from One Hour Wargames on a 6 x 6 grid to be played using The Portable Wargame rules, with Developing The Portable Wargame on hand to clarify any questions that arose. Forces were generated per OHW.

This was a chance to test my brain's reaction to 4-figures in a line representing a battalion in game terms.


Game 1, Tiger on a hill.

Game 2. Turn 2. The GIs arrive in force.

End of Game 2. The Germans are outnumbered 4 to 2 (there's an infantry unit to the left of the hill) and concede.

I had time to play the scenario twice - good thing as I made more than a few mistakes the first time through. Given the small size of the German force, I ignored the breaking point rules, and decided it would be 50% of the unit count. Both games went to the GIs, but I had a better plan for the Germans in the second game - using the infantry to hold the fords and delay the US advance - and they took it 10 turns before I declared it over for them.

Although very enjoyable, a few things felt "wrong" to me for my intended scale - primarily the shooting distances. So, as it was, I just began to think of them as "units" about half of the time, possibly companies, but definitely not smaller, and battalions the other half.

Nothing wrong with that, mind. However, that wasn't my objective. I think the shooting ranges are what throw me. They seem more suitable to a company per  square, to my brain at least. I'm not at all sure about reality. Generally speaking and in this game!

Tweaking The Portable Wargame is certainly a possibility. I have since stumbled upon Hexes and Miniatures  and there are many ideas there to borrow as well. Perhaps its the "basing" of the units that didn't work? The other possibility is that perhaps a battalion per unit, up to a division per side, is not the best option, and maybe going with a company per unit is.

However, with the space available to me, I think at best I could field an infantry regiment with support in this manner. In any case, more testing to do for sure.

Unrelated to anything above, my little boy was home sick yesterday. He was bored - an amazing feat given all the toys he has. In an effort to alleviate the pain of screen-free time, I lent him some of my unpainted figures and .

Here he is entertaining himself with some Britain's guns and some match sticks for firing. There were no objectives, no concerns about scale incompatibilities, nothing but fun, which is really what it's all about anyway.

Little wars.

Sunday, January 27, 2019

A Change of Pace: Returning to Grid-based Games

While contemplating the games I enjoy playing and the kinds of games I want to play for WWII, I realized that I really want a higher level game where the result is something like the battle descriptions you read on Wikipedia (I know, I set the bar high). Grids seem like the easiest way to do this without a large investment in additional figures and time spent painting them as they make abstracting an easier prospect, at least for me.

2012, playing"Pacific Assault" rules from Lone Warrior. 

My gaming cloth already has a 6" grid on one side, from that time a few years ago when I had a 4' x 4' table top (which I do again, thanks to a plywood acquisition). Of course, that didn't stop me from contemplating grid sizes from 3" up to 6" and agonizing over it for a few days before settling on exactly where I started.

2014. This is a Crossfire scenario called "Stug Smuggling" from lloydianaspects.co.uk
Converted to The Portable Wargame
To my own surprise, it turns out, I have very definite opinions about what different numbers of figures can represent and in what layouts they can represent them, so it took more time than I expected to make a decision on exactly what number/arrangement of figures I would use and what size unit they would represent..

After an hour or more of manipulating figures and taking pictures and analyzing my reactions to them, I determined that three or four figures in a line seems to work for my brain with respect to calling each unit a battalion (the de facto assumption for The Portable Wargame from what I can figure. Although I get that they can be whatever you want, I think from the perspective of converting scenarios, historical and otherwise, it helps to have a clear idea of what you're working with).

I hope to get in a small 6 space x 6 space game of The Portable Wargame in, using a scenario from One Hour Wargamesm tonight, to see if my decisions really do work in practice.


Wednesday, January 23, 2019

WWI Italian Front Research

I finished Caporetto and the Isonzo Campaign: The Italian Front 1915-1918 (easy read, chronological in approach, tight focus - like it says on the tin, assumes little foreknowledge of the reader, wonderful photographs, bibliography is mostly secondary sources) and I'm about 1/3 into The Italian Army and the First World War
 
With some Christmas money still burning holes in my pocket, I picked up two related titles:


There are a small number of hex-and-chit wargames based on this theater of the Great War, so, unlike choosing a WWII boardgame, or even one for the fighting in the rest of Europe, the choices aren't paralyzing in their immensity.

Burning Mountains gets good reviews on BoardGameGeek and was among the least expensive options (it was on sale at On Military Matters - one of my favorite places to order from) and it doesn't seem terribly complex - but certainly more involved than my toy soldier approach to gaming. In addition to the game, the magazine includes a short article on the spring offensive modeled by the game.

Eventually I will field miniatures for Italy and Austria in WWI (in 1/72 most likely), but I will wait on that until I have a better idea of what about it I want to game.

The War in the Mountains is a lot slimmer and smaller than I expected (I didn't really look at that part of the description on Amazon). Had I paid full-price, I might be a bit irritated, but as I scored this used for a pittance, and it's in like-new condition, I'm not unhappy. Whether reading it is worthwhile, we shall see.

I still have a little money left and it's quite likely I'll pick up a few more books on the topic (I basically raided the bibliographies of the books I have and went looking for the titles). It's also spurred on my interest in WWII fighting in Italy - a fairly neglected topic in movies/documentaries (and wargames tables) compared to much of the rest of the war, albeit less neglected than the Southern Front in WWI.

Tuesday, January 22, 2019

Re-basing Update

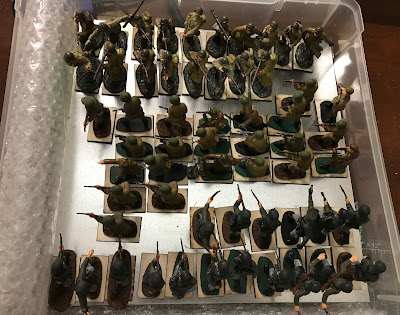
I finally started re-basing my 54mm WWII infantry on Litko bases, with magnetic sheet attached, to allow for a completely non-committal basing scheme,

It is most definitely time-consuming and somewhat tedious.

(Mostly) Matchbox Germans and a mix of Airfix and Supreme (Italeri clone) Soviets.

Being able to fit so many figures into a single case is pretty exciting.

Figures stuck to galvanized steel sheet. Yay! Science!

Unfortunately, I got carried away basing the Soviets, who haven't even been out on the table in 3 or 4 years and weren't part of my original calculation for my order from Litko, and I also failed to account for mounting the prone two-person German and Soviet LMG teams on 4 bases each (2 per figure), so I'm going to need to order more bases. 

For some reason I ordered 25mm x 40mm bases for my original order. I probably should have ordered 1" x 1.5" so, for consistency and to avoid having to redo all of the figures I have done already, I'll stick with the 25mm x 40mm.

The other "problem" is that it's been so long since I painted a WWII infantry figure, I forgot what color green I used on the US bases - an attempt to match my Britain's Big Red One figure bases - which is the color I want to use now on all of them for a semblance of consistency.

I think it was Vallejo German Camo Dark Green, and it doesn't look too far off, so that's what I'm going with.

Saturday, January 19, 2019

April 9th: Skirmish Inspiration

I watched "April 9th" last night; I had not heard of it before but Amazon Prime put it in my "Recommended for You" list.

Sometimes I question their algorithm, but this one they got right:


From the youtube description: "In the early morning of April 9th 1940 the Danish army is alerted. The Germans have crossed the border; Denmark is at war against Europe's strongest army. In Southern Jutland Danish bicycle- and motorcycle companies are ordered out, to against all odds, hold back the forces until the Danish reinforcements can be mobilized."

It may quite possibly be one of my favorite movies set during WWII of all-time. It is certainly near the top if not the very top.

It is also full of inspiration for small scale wargaming encounters - even a mini-campaign of the kind suggested in One Hour Skirmish Wargames where you follow a single squad/platoon from one decision point on the map to the next in a limited geographic area. In this case, you could follow a squad of cyclist infantry as they try to hold back the German advance, and undoubtedly have to fall back to different defensive positions.

I really wish I had some Danish bicycle troop figures and early German armor.

There isn't anything in 54mm that I can find, at least readily, but it looks like Early War Miniatures has suitable figures, albeit in 20mm.

For more historical background, check out this fantastic PDF with wonderful illustrations and maps.

Thursday, January 17, 2019

One Hour Skirmish Wargames: Plan Tortue Scenario (Just tanks!)

I was eager to try out my ideas for an all-tank game using One Hour Skirmish Wargames, so I grabbed the Plan Tortue scenario from the book an(French resistance vs Germans with some vehicles) and modified it for my purposes.

Somewhere in Europe, 1944, a weakened German tank troop is en route to join its battalion. The Allies have set a trap with a minor road block (a large downed tree) to slow the advance and a troop of Shermans to take out the German armor.  

The Germans win if they get the Tiger off the board (it should be one vehicle, but I decided the Tiger had to do it),  the Allies win if the keep the German armor from leaving the board, either by delay or destruction. There are 6 turns allotted for the scenario.

To clear the road block, a German tank must make contact with it, and then spend movement points, up to 3 per phase, until they draw a face card.

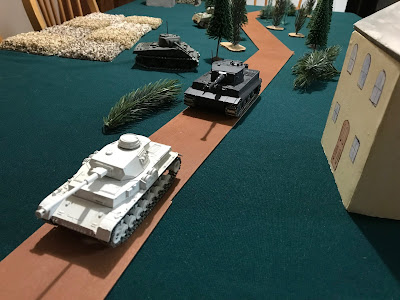
I setup  long was on my 3' x 5' kitchen table - tracked vehicles move at 12" so the extra length felt necessary. I don't have a lot of trees,but the trees on each side of the road are considered to block line of sight. The field is not harvested and blocks LOS as well.

Overview of the battlefield.


From the Tiger's point of view.

Two Shermans wait in a field.

Another waits in the open (but shielded by trees).

The column, such as it is, is off.
The Shermans advance but the column ignores them to race by.
The Pz IV demolishes the barricade.
Things don't look good for this Sherman but they survive.
And then team up with their fellows to unleash a torrent on the Tiger. And were totally ineffective.
The Tiger escapes. German victory! The Allies take a parting shot and brew up the Pz IV, but small consolation.

*****
The tanks on both sides were either horrible shots or the armor did its job for almost the entire game.  I allowed the Allies one card draw after the Tiger escaped and finally someone did some damage - and they brewed up the Panzer in one  hit! So, I never got to test my ideas from the previous post.

That said, the game played quite well without them and I was never quite sure if the Germans would make it or if the Allies would succeed.

For a 'beer-and-pretzels' type tank game, it was quite a bit of fun - there were a number of choices to make. For instance, I opted to get the Panzer off the road so the Tiger could get off the board, but that used up the points on that particular turn, and the Tiger had to sit for one more Allied phase and risk destruction.

I think the barrier card draws worked well - that's in the original scenario. One thing that I thought of doing instead was allowing HE fire to blow up the barrier, maybe by treating it as a regular target. That is, the tank would draw a shoot card and the barrier a defense card.

Forty-five minutes from start to finish, and I barely needed to consult the book once I got going. I only turned over one Joker, so it was two turns, but 5 or 6 phases for each side. I didn't have to let the Allies have their last phase but I figured 'why not' since no one had done any damage. And, of course, that's when they decided to be effective.

Wednesday, January 16, 2019

One Hour Skirmish Wargames: Tank vs Tank Idea

Still inspired by Battles with Model Tanks: Wargaming 1914 - 1975, I have been contemplating using One Hour Skirmish Wargames for a tank vs. tank battle, a la What a tanker! and Bolt Action Tank War. Now, John Lambshead (OHSW) explicitly states, "Normally only one side will have an armoured vehicle as this is an infantry skirmish game ..."(p.38),  but being a typical wargamer, I can't help but say, "I'll use the rules how I please!"

(I mean that in good fun, nothing insulting intended)

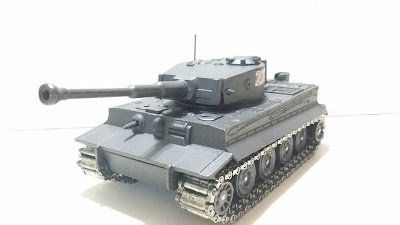
As I have no pictures yet, here'one from an old blog post when I first got my Solido Tiger I.

Please note, I haven't tried the following yet, but I plan to.

One feature I like very much in OHSW is that you don't know how long vehicles will survive - they take cumulative damage and compare that to card draws, so they can go down on  one hit or last quite awhile.

If the game is small-squad infantry focused, any more detail probably isn't warranted, but in an all-tank game, some kind of effect from each hit could make it more interesting by creating some more friction.

In Disposable Heroes/Coffin for Seven Brothers (1st ed) (DHC7B), damage location is randomly determined by a ten-sided die. Different locations have different effects, also determined by a ten-sided die. In OHSW, it seems like we could do the same thing with a draw of a card. While it's possible in DHC7B to have a different percentage chance of hit location by vehicle, I've opted to forgo that possibility (a quick glance in the 1st ed core rulebook, shows the included tanks all have the same chances for location).

Also, although some of the effects result in instant destruction of the tank, that is already handled by the OHSW rules, so instead, I plan to put focus on the immobilizing and half speed effects, and killing of the hull or turret crews (loss of movement and fire respectively, maybe not entirely realistic as crew could move around if necessary I suppose)

Here, is a rough translation of the DHC7B results into card draws (I consolidated their two separate hull locations):

Damage location:
  • Treads: A - 3
  • Hull: 4- 9 
  • Turret: 10, J, Q, K

Results:
  • Turret: J, K, Q - Turret damaged / crew killed, no firing (You could probably split this to have no firing vs. no turret rotation)
  • Hull (upper/lower): J, K, Q - Hull crew killed, no movement
  • Treads: 10-J axle damaged, 1/2 movement | Q-K thrown track, immobilized

Honestly, I think between the rules in OHSW and the above, I have enough to try it out.

Another picture from an old post featuring armor.

Tuesday, January 15, 2019

First Try at One Hour Skirmish Wargames: Get the Tiger!

I have been itching for several days to get a game of John Lambshead's One Hour Skirmish Wargames (OHSW) on the table to try out the rules.

For the scenario, I decided to go with the first one in the book, Capture the Cannon, but, as I have no Napoleonic figures and inspired by Featherstone's and Robinson's Battles with Model Tanks: Wargaming 1914-1975, I turned it into a tank recovery mission.

Somewhere on the Eastern Front, a squad of Germans has been sent to secure a disabled Tiger I before the recovery crew and vehicles can arrive. As they arrive, they see that the Soviets have already surrounded the tank.
 
The forces were a mishmash of eye-balling the British and French lists and what I wanted to put on the table. I really wanted to use my TSSD Russians and winter Germans, which are not painted and likely never will be (I just love the sculpts) so that limited my forces considerably, although the Soviets did get the sniper. For cavalry, I gave the Germans a kublewagen - not exactly a 1:1 correspondence there, but it would do.

Aerial photo of encounter between Russian and German forces.
The Germans won the initiative Ace of Hearts to Ace of Clubs and then drew the King of Diamonds (13 points). It looked like it was going to be a long day for the Soviets.

Artsy over-the-shoulder shot of German squad LMG and rifleman as they knock down two Russians guarding the objective.
But, after just 7 points of mostly shooting (resulting in two downed Russians), the first Joker came up and the turn ended!

Both sides easily passed the morale test. One of the Russians was a casualty, while the other was back in the fight.

Turn 2, the Germans won initiative Jack vs an eight, and drew 8 points to spend. I figured the Germans were trying to suppress the Russians before advancing, so again, I spent points shooting, only to have their second Joker come up before they used all their points.

With only 5 turns to reach their objective, time was running out fast. On the plus side, two Russians were removed as casualties.

The Germans won the initiative on turn 3, King vs Jack, and then drew the Queen of Hearts for 12 points of action. The squad LMG opened fire and then the kublewagen raced up to the tank and opened fire with the machine gun.

The kublewagen finally moves and opens fire with a hail of bullets!

Perspective shot. Not pictured, Soviet sniper - just beyond the left edge of this photo.
The next shot taken resulted in a Joker being drawn by a Russian as part of their defensive draw.

THREE TURNS DOWN.

Again the Germans won the initiative, nine vs five, but they only drew the Three of Hearts and didn't accomplish much.

Finally, the Soviets got their chance to do something! And they drew the Five of Clubs.

Not exactly a great start, but I hadn't noticed I had set up a German  officer in way that the sniper had a clear shot. She didn't even need the 2nd card - she downed him on the first shot!

The two SMGs nearest the kublewagen opened fire and delivered a cumulative 18 points of damage - it went up in a Hollywood fireball.

Boom!
Surprisingly, no Jokers had been drawn, so the Germans drew again - the King of Spades for 13 points.  Retribution would be swift! With one turn left, they were going to have to move quickly and with 13 points surely they could do it.

On the first shot fired, the defending Russian drew a Joker!

Turn 5 would be the last turn regardless of outcomes. The Germans won the initiative again, five to Ace, but would it be enough?

I decided they would have to rush forward in order to get some decisive close combat in if they were to have any chance of breaking the Soviets who had thus far avoided that fate.

It was too little too late - after some back and forth, two phases each - when the next Joker came up, this is how things looked:

End game. The Soviets losses were heavy but the sons and daughter of Mother Russia were victorious!

Impressions

From start to finish, it was around an hour and a half. However, a good fifteen of those minutes was me trying to find a second deck of cards! Had I known where the second deck was, and had I been more familiar with the rules, an hour would have been definitely possible.

As a fan of card-based initiative (G.A.S.L.I.G.H.T.) or action resolution (IN-RADIC, Kodoka Trail), I am predisposed to like OHSW, so I was not surprised that I found the game enjoyable. I will definitely play again.

I played with 1/32 figures but left the ranges as written. Realistically, even with 28mm figures, all weapons would be the entire table. However, the shortened ranges for the SMGs and pistols make it feel movie-like, which I'm OK with. If you're not, get rid of the range limits or adjust to taste -maybe one card for an SMG beyond 18, two under. I had one thought right of the bat: the scenario map is pretty sparse on details.

In fact it is about as simple as you can get for this scenario - a road with a cannon/tank on it. It would be helpful for those new to wargaming (or not great at terrain placement) for some kind of system or more populated map. Admittedly, terrain placement systems are available in a lot of rule sets, and they are all pretty much the same, but for a newbie, it could be helpful to have it included.

Speaking of the scenario. I have read a few complaints about the lack of generic scenarios in this book compared to One Hour Wargames.

I would argue that all scenarios are adaptable to one degree or other.

While I didn't do a great job substituting the forces on a points basis(not really a points player though anyway), I just swapped out the cannon for a disabled tank, British for Soviets, and French for Germans, picked out some figures and voila, the first scenario became a WW2 scenario. If I had put more than 5 minutes into my conversion, I'd probably have come up with better point-matched forces.

There were some grey areas, in the rules that I encountered, or rather, I was probably overthinking it and I didn't recall reading anything clarifying and didn't want to spend time looking it up during the game:

For one, I couldn't decide if I should draw the 2nd, 3rd, etc card if the first one succeeded when defending in cover, shooting multiple shots at a single target with no one nearby (and the target was downed on the first one), or testing for the army breaking. That is, I wasn't clear if the additional card is required: "you MUST draw two cards in light cover"  vs "you may draw up to two cards in light cover".

In the game I played, at first, I required all the cards to be drawn. This increased the possibility of a Joker coming up, to the Germans great detriment. Later, I decided to stop if the first draw resulted in the desired result.

I also wasn't clear about multiple shots from an SMG into a vehicle. For infantry, if you shoot and hit on the first card, your second card can target someone nearby (because you can't target a downed figure). I decided that for a vehicle, it was more than likely that the second card would also target the vehicle since, for them, damage is cumulative and as long as the vehicle wasn't destroyed by the first shot, the second shot would target the same vehicle.

Minor things really that did not detract from the fun. I'm looking forward to playing another game with these rules soon.

Tuesday, January 8, 2019

Primed for Painting in the New Year

I am knee deep into Caporetto and the Isonzo Campaign and thoughts about gaming WWI on that front are bouncing around in my head, but, wanting to do something with more immediate rewards, I spent a little time doing various painting/basing related items last night.


In the foreground, you can see primed Armies in Plastic Russians. About half were primed with white gesso, which the green paint did not cover well. So they were painted black. The other half were primed with black gesso and are need in some touch ups before continuing. The fellow in green in the back is a test paint of the green - at only one coat, it looks a little dark, but given that matches with some of the pictures and descriptions found online (and in the entirely historically accurate Space 1889: A Soldier's Companion), I think I will keep it.

For the great coat/bed roll, I am thinking of using a grey green from Vallejo that I have used on my US airborne webbing:
This figure is the sole completed US airborne in 54mm I have (I have a platoon in 15mm).  I have a handful more in various stages of completion, but they aren't a priority. At most I could field 9 or so of them.
It is no doubt historically inaccurate (in both cases). If it doesn't work for me, I have a few other green/grey combinations to try.

As for the straps and belts and all that, I'm doing my best to squint at the illustrations I have found to guess the colors (Soldier's Companion says their gear is black which seems a little simplified, but may not look bad in the event).

Behind the Russians, primarily Chinese Airfix copies from Classic Toy Soliders have been based on the new bases I got from Litko. Unlike the size I use for the late 19th C. these bases can fit three across per 3-inch square (which Is what I use multi-figure basing for my WW2 games).

In case you are wondering, the blue fellow in the back is an Airfix figure from a few years ago.  The copies are quite good size-wise and little loss of detail. Given that I tend to paint in a 'toy soldier-ish' style, lack of detail is not a detriment in any case.

Far behind everyone sits an officer on a camel, who will have to wait a bit.

Wednesday, January 2, 2019

A Christmas Bounty

This post comes to you live from the frigid lands of Western New York. My son and I are here to visit my parents for a few days - a belated Christmas and New Year's celebration.

Although they had sent most of his gifts to our house so he could open them Christmas morning, mine were here waiting under their tree:


 A nice little haul of titles from my "to read" list. 

One-Hour Skirmish Wargames was a late addition to my list, but Dale's posts over at  daleswargames.blogspot.com have piqued my curiosity about the system.

There was also a nice bit of currency to spend how I please that will go to purchasing a starter Bolt Action force. I may also pick up some plywood so I can play 4' x 4' games on the kitchen table - I would like to grid one side for some Portable Wargame fun.

And now with everyone in bed and the house quiet, I'm about to grab some olives and bruschetta and settle in and do a little reading.