Friday night, for the third time in a week, I returned to
Tabletop Teaser #1: The Bridge Demolition, with my modified Morschauser rules. Due to the randomized
arrival of Blue's forces, variety is insured, and the limited objective (hold for x turns,
then blow the bridge) of Red, means the scenario is well-suited for solo play.
That said, Red can, of course, be more or less cautious and therefore they are not without options, but by and large they don't require as many decisions as the Blue force. I chose to play Red cautiously again this time but gave myself just 10 turns to achieve the capture of the bridge/stopping of the demolition. The reduced time frame and a rules tweak (I got rid of the saving throw , and went with a simple treat-all-cover the same, 6 to hit for all but MGs, MGs hit on 4 or 6 when target in cover -this decreases the life of units somewhat - but not as much as no cover adjustment - while speeding up combat) increased the sense of urgency I felt
 |
| The by now familiar setup. |
 |
| Lead Soviet rifle unit in the woods with a tank unit in support. |
 |
| The 1st German tank unit arrives on turn 2 and finds itself threatened by a Soviet tank unit hull-down on the hill. |
 |
| Trying something different this time, I decided to advance while firing, rather than stopping to engage in a back-and-forth. |
 |
| A few turns later, and the German right flank has an embarrassment of riches. Again, they sought to bypass rather than engage the enemy unnecessarily. |
 |
| The first Panzers reach the bridge and come under AT fire from the Soviet ATG. |
 |
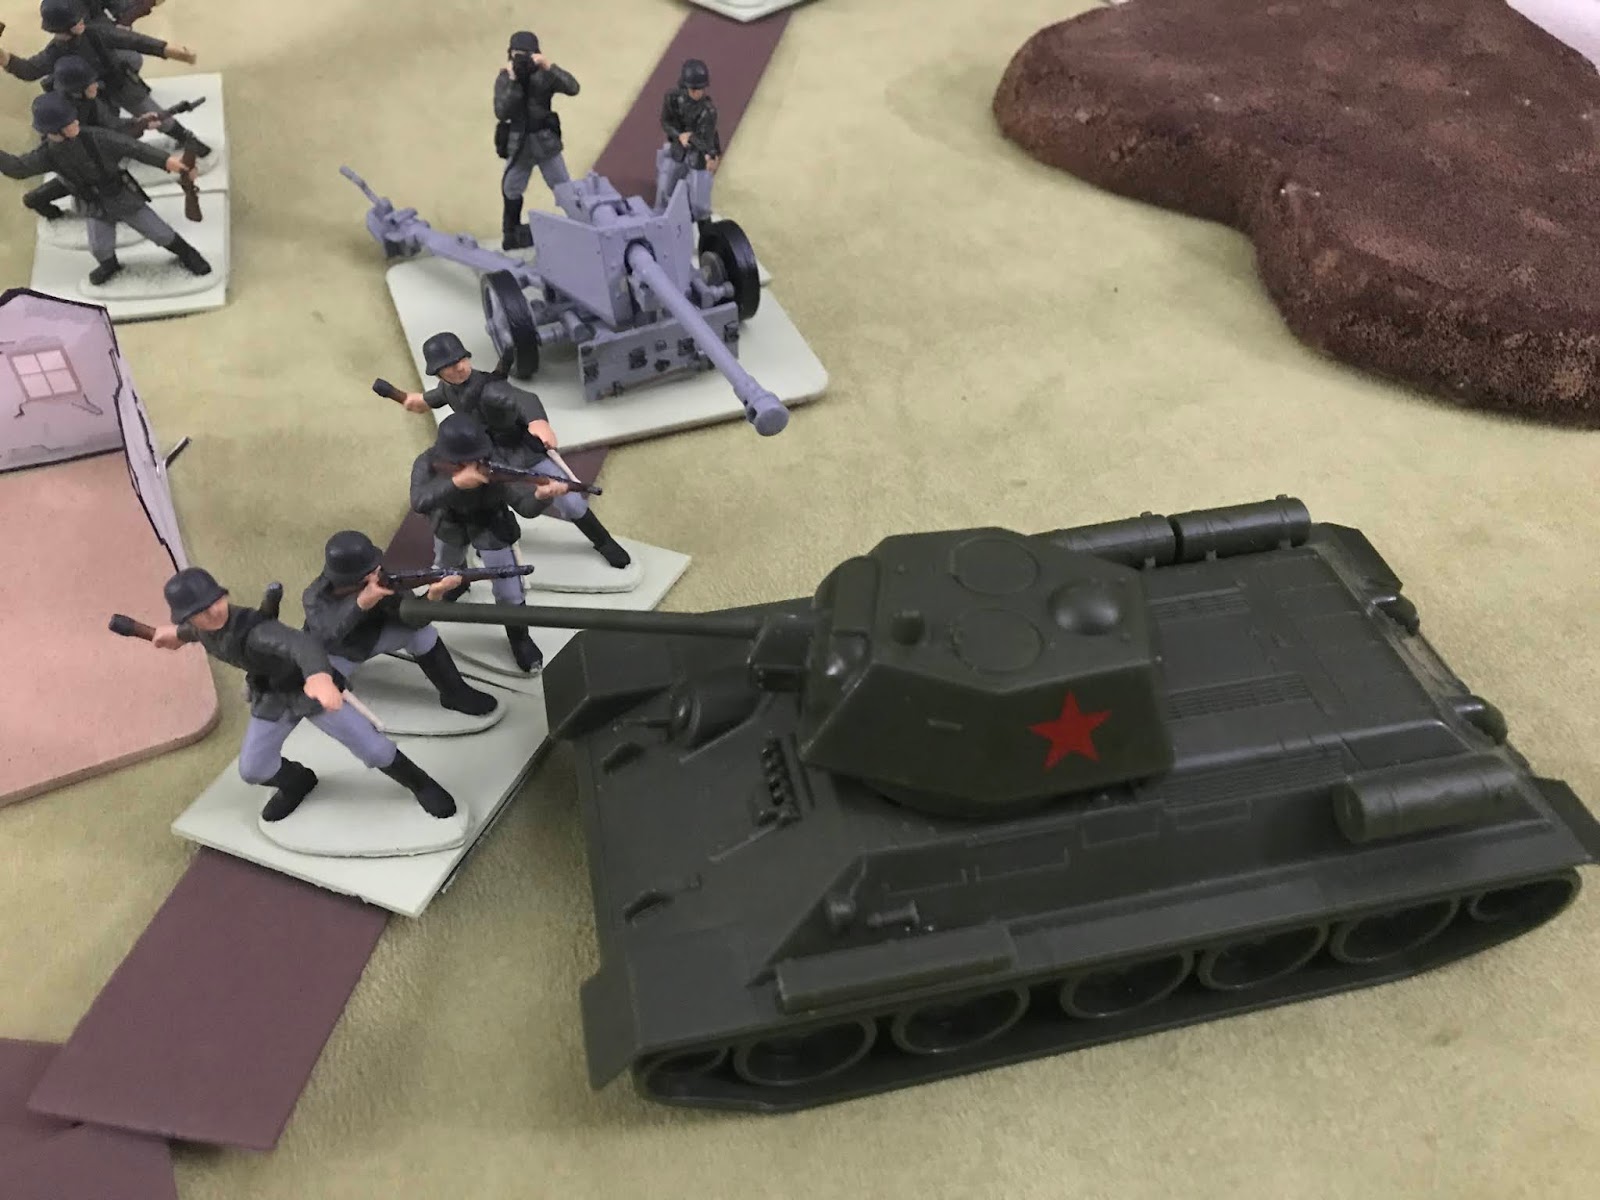
| And they are mopped up by Red Army infantry closing in and using their AT weapons at close range. |
 |
| On the German right, Panzers drove back the Soviet tanks. So unexpected was it, the German PAK-40 never had a chance to fire after deploying. |
 |
| On the German left/Soviet right, the unit of T-34s came under fire from the second PAK-40 and infantry armed with AT weapons. They were less successful than their Red Army counter-parts. |
 |
| The Germans having lost their 2nd Panzer unit earlier, along with their recon unit, was primarily left with infantry, who faced a tough road. Literally - the bridge is blocked by a weakened but still dangerous company of T-34s. |
 |
| Hand-to-hand fighting breaks out in the streets and buildings north of the river and German infantry close assault the Soviet tanks blocking the bridge. |
 |
| The brutal melee north of the river left neither side in control of that portion of the village. The Soviet armor on the bridge overran the German infantry, buying enough time for the Soviet engineers to finish wiring the bridge. A massive explosion signaled the failing of the German attack. |
****
An exciting and fun game with an outcome that was up in the air until the end.
Despite being my third time playing it, I'm not done with this scenario (recently - I have played it in the past a few times). I would like to try some different approaches to the Soviet defense (perhaps something more aggressive). It would also be interesting to try to consolidate the German force before advancing (something far more cautious than this most recent game) - they'd lose turns that way, up to 6 depending on how the arrivals roll up, but perhaps could make up for it by advancing en masse.
I also have an itch to move this to a grid for giggles.


I don’t need to continue my blog. You are doing everything and doing it better I think. I am interested in the rules you are using though. For example, are you using the roster system? And what ranges are you using? It’s a big pity we are not closer we could play a game.
ReplyDeleteThank you, Steve! But I love your blog and your games so please do not stop! And I completely agree about not being closer. I'm grateful for the blogging community or I'd feel far too isolated on my 54mm island in a 28mm sea.
DeleteFor Morschauser, I am using the roster - I track it with a single die for each unit (only when they've suffered a loss, to keep the table tidier), which is sometimes visible in the pictures. However, I slow removal by including a cover adjustment to the roll as well as a rallying phase as part of the turn so units can recover. For range, I am using 1" = 100 yards, with spotting enemy units only possible to 12" (kind of like Neil Thomas, only here it represents 1200 yards). Rifle unit range is 6" (here the unit is a company and so the stand includes the weapons platoon as well as the rifle squads with their LMGs), MG is 9", and Tank/ATG 12". I'll post my rules modifications this week. Probably Friday.
They might still play fast for a 6-on-a-side OHW setup. I haven't tried that with my latest iteration, but I'll include the options that I know do work with that, too.
Nothing speaks as well of a game as the urge to play again!
ReplyDeleteIndeed! It was just the right combination of rules and scenario.
DeleteWhat a beaut little game! Similarly to Ross' remark, it's great to give a scenario several 'outings', I reckon. It looks brilliant at the increased scale that you use too.
ReplyDeleteThank you, James! Looking forward to playing it again this weekend possibly. The random arrivals both in turn and location really make it interesting each time.
Delete